The Windows Sandbox tool acts as a temporary virtual desktop environment. However, while trying to use this tool, you may get the error “Windows Sandbox failed to start”.
In most cases, the error message says “Error 0x80070015: Windows Sandbox failed to start—the device is not ready”. In other cases, the error code could be 0x80070057, 0x800706d9, 0x80070002, 0x80070569, 0x80072746 or 0xc0370106.

Regardless of which Sandbox error code you receive, the following article will show you the top tips that can help troubleshoot Windows Sandbox not starting.
1. Disable and re-enable the Windows Sandbox tool
Restarting Windows Sandbox might be the best solution to this problem. So here's how you can turn it off and back on again:
1. Press Windows Key + R to access the Run command dialog box. Type optionalfeatures and press Enter to open the Windows Features program.
2. Next, scroll down and uncheck the Windows Sandbox option. From there, click OK.
3. Select Restart now in the pop-up window. This will restart your device and apply the current changes.

When the device boots, open the Windows Features program following the previous steps. Next, check the Windows Sandbox option and then select Restart now in the pop-up window
2. Run Windows services required by Sandbox
Sandbox errors often appear when some Windows services are disabled. So let's see how you can enable some Windows service to solve this problem:
1. Press Windows Key + R to open the Run command dialog box. Type services.msc and press Enter to open the Services window.
2. Find Hyper-V Remote Desktop Virtualization Service, right-click it, then select Properties.
3. Next, navigate to the General tab. From there, click the Startup type drop-down menu and select Automatic.
4. Click the Start button, click Apply, and then click OK to save these changes.

5. Finally, close the Services program and restart the PC to save these changes.
To avoid encountering the same problem in the future, you will have to configure some additional settings in the Services window. Let's see the steps you need to follow:
1. Open the Services window following the previous steps.
2. Right-click on Hyper-V Remote Desktop Virtualization Service and select Properties.
3. Navigate to the Recovery tab.
4. Next, click the First failure drop-down menu and select Restart the Service. This will help restart this service automatically in case it encounters any problems.
5. Click on Second failure option and select Restart the Service for this option. Finally, click Apply and then OK.

In case the Sandbox issue persists, try applying the same setting to the following other services:
- Hyper-V Host Service
- Hyper-V Time Synchronization Service
- Virtual Disk
3. Restart Hyper-V and other programs on the "Windows Features" screen
Restarting a few programs on the Windows Features screen may help. However, this method will only work if you restart the features that the Sandbox engine depends on.
In this case, we will restart Hyper-V, Virtual Machine Platform and Windows Hypervisor Platform features:
1. Press Windows Key + R to access the Run command dialog box. Type optionalfeatures and press Enter to open the Windows Features program.
2. Scroll down and expand the Hyper-V option. Next, uncheck the Hyper-V Management Tools and Hyper-V Platform options.
3. Click OK, close the Windows Features program, then restart your device to save these changes.
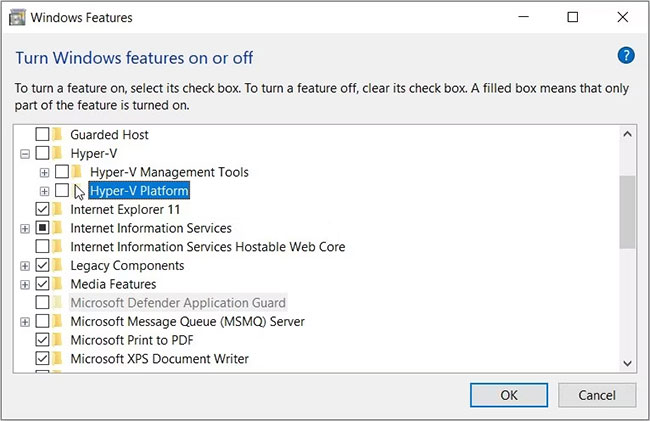
Finally, apply the same changes to the Virtual Machine Platform and Windows Hypervisor Platform.
4. Use the built-in debugging tools
Built-in troubleshooting tools can help you solve this problem. However, this will depend on the nature of the problem.
If the Sandbox error is caused by hardware related issues, you can fix it using the Hardware and Devices troubleshooter. But if the problem is due to a system maintenance issue, then you can try the System Maintenance troubleshooter.
In case you're dealing with a hardware problem, here's how the Hardware and Devices troubleshooter can help:
1. Click the Start menu icon and select PC Settings. Next, select Update & Security, and then click the Troubleshoot option.
2. Select the Hardware and Devices troubleshooter on the right pane. From there, click Run the troubleshooter.
4. Follow the steps on the screen to complete the process. When you're done, restart your PC to save these changes.

On the other hand, if you're dealing with system maintenance issues, here's how the System Maintenance troubleshooter can help:
1. Press Windows Key + R to open the Run command dialog box. Type msdt.exe -id MaintenanceDiagnostic in the search box and press Enter to run the System Maintenance troubleshooter.
2. Click the Advanced option on the next screen. From there, check the Apply repairs automatically box.
3. Finally, click Next and follow the on-screen steps to complete the process.

5. Repair Corrupted or Missing System Files
Are you still struggling to resolve the issue? Perhaps there are some corrupted system files that are interfering with the Sandbox feature’s functionality.
In this instance, you can use the SFC and DISM tools. These are some incredible features that help repair corrupted or missing system files.
So, let’s start by checking out how you can use the DISM feature:
1. Type Command Prompt in the Start menu search bar, right-click on the Best match result, and then select Run as administrator.
2. Next, type the following command and press Enter:
DISM /Online /Cleanup-Image /ScanHealth
3. Wait for the scan to complete. From there, type the following command and then press Enter:
DISM /Online /Cleanup-Image /RestoreHealth
Wait for the process to complete and then restart your device. Next, run the SFC tool by following these steps:
1. Type Command Prompt in the Start menu search bar, right-click on the Best match result, and then select Run as administrator.
2. Type the following command and press Enter to run an SFC scan:
sfc /scannow
Finally, close the Command Prompt and then restart your PC to save these changes.
6. Restore Windows to Its Previous State
Is this the first time you’re encountering issues while using the Sandbox tool? If that’s the case, then this might be caused by a few recent changes on your device.
Maybe you’ve installed a faulty program that’s interfering with the Windows Sandbox. Or, perhaps you’ve configured some settings unknowingly, and this is affecting the Sandbox tool.
In such instances, you could resolve the problem by restoring your PC to its previous state. So, let’s check out how you can use a Restore Point to tackle this issue:
1. Type Create a Restore Point in the Windows search bar and select the Best match.
2. Navigate to the System Protection tab.
3. Click System Restore and press Next.
4. Select Show more restore points.
5. Select your preferred restore point and click Next. Finally, click Finish and wait for the process to complete.

7. Update Your Device
When all else fails, you can try updating your device. This could help tackle this problem and any other system issues.
So, here are the steps for updating Windows:
1. Click the Start menu icon and select PC Settings.
2. Next, click Update & Security and select Windows Update.
3. Press Check for updates on the right-hand side and follow the on-screen steps to finalize the process.

Windows Sandbox Failed Error: Resolved
The Windows Sandbox is a reliable tool that provides you with an awesome virtual desktop environment. If this tool fails to start, you can easily fix it using any of the methods we’ve covered.
And when Sandbox is up and running, be sure to set it up correctly so that it won't run into any issues in the future.


No comments:
Post a Comment