If you want to get a little creative or explain something better in your Microsoft Office document, you can add a 3D model. This is a super handy feature for people who often work with these types of images because you can insert images you have saved. However, for everyone else who wants to add some cool stuff, you can search for the available 3D models and choose from a variety of categories.
For example, you can add 3D animals to your book reports in Word, buildings to your corporate spreadsheets in Excel, medical instruments to your health presentations in PowerPoint, or emojis. to email in Outlook.
Along with adding an eye-catching 3D image, you can format it to view a specific angle, make it larger or smaller, or align it perfectly on your page or slide.
Availability of Microsoft Office 3D Models
3D models are supported in Microsoft Word, Excel, PowerPoint, and Outlook on Windows and Mac. You'll see this feature in Microsoft 365 and the 2019 and 2021 versions of these Office apps.
On Mac, you must have macOS 10.12 or 10.13.4 or later. This feature is not supported on macOS 10.13.0 to 10.13.3 or 10.11 and earlier.
You can also use Microsoft Office 3D models in Word, Excel, and PowerPoint on Windows Phone 10/11.
How to insert a 3D model in Word
The process for finding and adding a 3D model in all desktop applications is the same. Place your cursor where you want to insert the image and open the Insert tab.
Click the drop-down arrow next to 3D Models and select Stock 3D Models. (For those of you who want to insert your own model, select This Device and browse for your model.)
When the window opens, you can use the search at the top and enter a keyword or browse the categories. Currently, there are almost 60 categories of stock 3D models, including animated ones. Select one or more models and click Insert at the bottom.
Your 3D model will pop right into your document. You can move the image where you like by simply dragging. Then, you’re ready to format it!
3D model format
The simplest way to adjust a 3D model is to use the tools in the ribbon. Select the image and then click the 3D Models tab that appears. Here, we will only highlight some tools that you may find useful for 3D models.
Choose a View
First, you can choose a view for your model. Use the arrows to scroll through the options in the 3D Model View box, or click the arrows at the bottom to see them all. While you can rotate or tilt your 3D model easily (described below), this allows you to choose the angle you want to start with.
Location with Text
To position your model with the text on your page or slide, you can use the Position drop-down box in the ribbon or the Layout Options button shown. With these options, you can fix the position of the image, move it with the text, or use text wrapping.
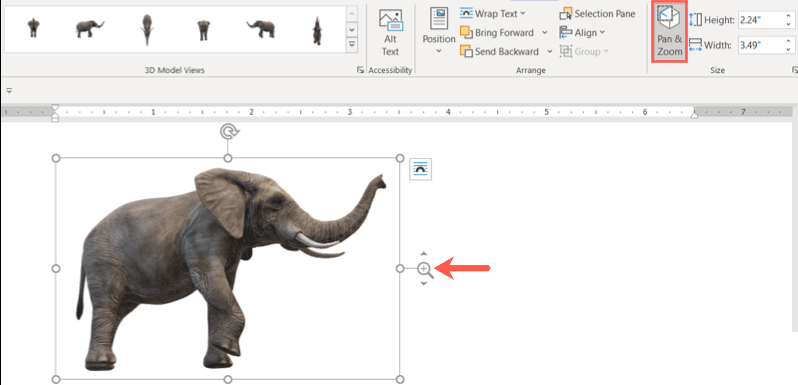
Pan and Zoom
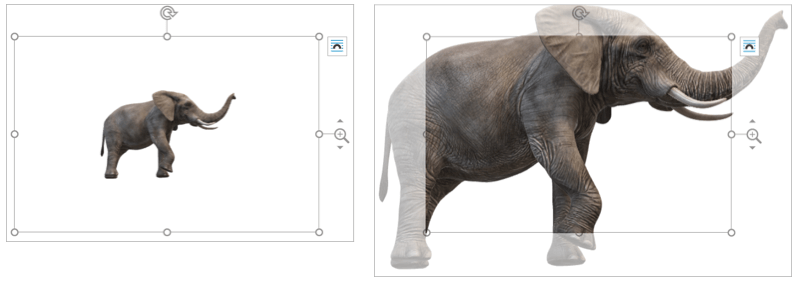
You can resize your 3D model just like any other image by dragging a corner or edge. But you can also pan and zoom within its frame, which is a handy feature. Click Rotate & Zoom in the ribbon and you'll see a plus sign in the magnifying glass appear next to the image.
Next, drag up to make the model larger or drag down to make it smaller. Remember, this is the size of the model in its frame. So this is ideal if you want to enlarge a specific feature or remove some white space around the model.
Using the Selection Pane
If you're using a lot of 3D models in your document, spreadsheet, slideshow, or email, you can open the Selection Pane to make working with them easier. Click the Selection Pane in the ribbon to open the sidebar.
You will then see each model you added. Choose one to make it a working model. You can also rename them for easier identification by clicking on the text and entering your own.
You can also hide specific models so you can focus on others. Click the eye icon to the right of a model in the list to hide and show it, or use the Show All and Hide All buttons at the top.
Rotate or tilt a 3D model
Each 3D model comes complete with a rotating handle and a tile in the center. Drag that handle in any direction to specifically view your model.
If you select an animated model, you'll also see a pause button in the bottom left corner of the frame. Click to pause the animation and then press the play button to resume.
Create your documents with 3D
3D modeling can provide a unique experience for your viewers. Whether it's a report or presentation for your company or a budget or email for your family, you can perfect it with a 3D Microsoft Office model.


No comments:
Post a Comment