Windows contains many unnecessary files and folders from hidden cache, old files you can delete them to free up space. But knowing if it's safe to delete those folders and files can seem like a challenge.

Let's take a look at some Windows files and folders that are actually safe to remove and why we might do it. Some files are in a protected area so be careful before deciding to delete them.
Best way to clean Windows folders: Disk Cleanup or Storage Sense

Before looking into Windows files and folders that can be safely deleted, you should know that deleting them manually is often not the best practice.
Aside from doing this yourself when you can automate the process it would be a huge waste of time. Using the Disk Cleanup tool to perform these cleaning tasks is safer. This helps you avoid common Windows maintenance mistakes, such as accidentally deleting important files or deleting the wrong folder.
The Disk Cleanup tool helps you regain disk space on your Windows computer and is very simple to use. You can open it by searching for Disk Cleanup in the Start menu and selecting a drive (C: in most cases). Let the tool scan and you'll see some file categories that you can delete. For more options, select Clean up system files and give admin rights before you go through the list.
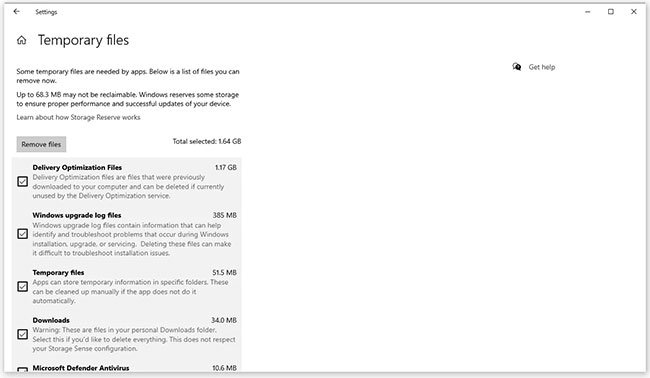
If you find this interface too cumbersome, you can browse to Settings > System > Storage to try out the newer memory cleaning tool in Windows 10 and 11. Click on Temporary files in the list of options, then you will see a list similar to what Disk Cleanup provides.

What to remove from Disk Cleanup?
This is by no means a complete guide to the Disk Cleanup tool, so we won't look at every item in this menu. Here are some of the most prominent options:
- Windows Update Cleanup: This will delete old copies of the Windows Update. In most cases, you can safely remove these, but if you're having update-related issues, you should keep them for troubleshooting purposes.
- Windows upgrade log files: Similar to the above, these are data files that Windows Update stores to help you find out about upgrade or installation related issues. You can remove these if you haven't encountered errors related to upgrading Windows to the new version.
- Language resource files: If you've previously downloaded another language or keyboard layout that you didn't use, this will allow you to easily delete it.
- Recycle Bin: Although you can empty the Recycle Bin through a separate window, you can also do it easily here. Just make sure there's nothing important inside that you accidentally left out.
- Temporary files: As the name suggests, temporary files are not used for any purpose for a long time, so you can delete them without worry.
Now let's see what you can safely remove from Windows 10 and Windows 11. Usually, these files are located on the C: drive, but you can find them elsewhere if you have multiple storage drives and have Windows installed with customization options.
1. Hibernation File
Located at location C:\hiberfil.sys
Hibernation mode is similar to Sleep mode, but the only difference is that the system will save all open work to the hard drive before shutting down. You can remove the battery from your computer and leave it in this mode for a few weeks, after starting backup and what you did before will still be intact. Of course, this also takes up space.
The hibernation file will take up a few GB or more depending on the size of the hard drive. If you do not use this feature and want to disable it, you can also easily do it through the Command Prompt. Remember that you should not delete the hiberfil.sys file because Windows will regenerate it on its own. Open Command Prompt (Admin) by right-clicking Start on the desktop. Type the following command to disable hibernation mode:
powercfg.exe /hibernate off
This video is the whole steps to disable hibernation function. When done, Windows will automatically delete hiberfil.sys, you can choose to delete or not. Note that discontinuing this mode will also mean that the computer will stop booting quickly on Windows 10, but it will not have a big effect on booting.
2. Temp Folder
Located at C:\Windows\Temp
Temporary files in Windows are junk files whose use is only temporary and becomes redundant when the task at hand is completed. Such temporary files are created to hold temporary data while the file is being created or processed or used. Windows temporary files are created by the operating system during normal running when there may not be enough memory allocated for the task.
As you know, temporary files on Windows will no longer be valid after first use. These files and folders contain information that is used only once by Windows. You can delete all the items inside by opening the folder by pressing Ctrl + A to select all and then pressing Delete. When doing this, Windows may error out for some items, but ignore them and continue cleaning up the rest. The C:\Windows\Temp\ folder contains some additional files that you no longer need to keep. Open that Temp folder and delete whatever you find in there.
The Temp folder is not the only place where temporary files and other groups of unnecessary files are stored on Windows computers.
The Settings app in Windows 10 has an entire section dedicated to deleting temporary files. Get there via Settings > System > Storage > Temporary files. This includes things like distribution optimization files, Windows upgrade log files, temporary files left over by applications, and more. Select what to remove, and then select Remove files.
Similar, harder-to-find temporary files are also accessible in older versions of Windows, like Windows 7, through Disk Cleanup. This utility is included with all versions of Windows and can automatically delete the contents of some other temporary folders for you. You can open it in the Run dialog box (WIN + R) via the cleanmgr command.

3. Recycle Bin
Located at shell:RecycleBinFolder
Recycle Bin is not really a folder and obviously many people already know about it, but for some readers who don't know, we can explain it to you as follows: whenever you delete a file on system, Windows will move it to the Recycle Bin. This is a special place where deleted files are kept until the user deletes them permanently or restores them. If you don't pay attention to the recycle bin, there can be many GB of old data still in there.
You can access the Recycle Bin on the desktop. If not found, type shell:RecycleBinFolder in the Run menu (press Windows + R button) or in the File Explorer navigation bar. There you will see all the recently deleted things. Click on individual items and select Delete to permanently delete them or Restore to return them to their original locations. On the Ribbon, you will see the Empty Recycle Bin or Restore all items buttons.

To tweak how the Recycle Bin works, click Recycle Bin Properties on the Ribbon. In this section, you can limit the size of the recycle bin or choose Don't move files to Recycle Bin (do not move files to the Recycle Bin). This customization will permanently delete items and completely bypass the recycle bin. But we do not recommend using this option because when accidentally deleted, the Recycle Bin is the place to find them again.
4. Windows.old Folder
Location at C:\Windows.old
When you upgrade your version of Windows, your system saves a copy of your old Windows files called Windows.old. This folder mainly holds everything created on your old computer in case the conversion goes wrong. In a bad situation, you can use this folder to restore a previous version of Windows, or you can also open the folder and retrieve some lost files as needed.
Windows automatically removes folders after 10 days, but you can manually delete them when you need more space. It won't delete on File Explorer, so type Disk Cleanup into the Start menu and launch the tool. Click Cleanup system files at the bottom of the window and allow scanning of system files. Once done, find Previous Windows installation and remove it with this tool.
Obviously, removing these files is harder than recovering them. With the upcoming Windows 10 Creators Update, we recommend keeping this folder until you're sure everything is working properly.
5. Downloaded Program Files
Located at C:\Windows\Downloaded Program Files
This file actually holds the files used for Explorer's ActiveX controls and Java's applet, so if you use the same feature on the same site it won't have to be downloaded twice. Therefore, this directory is completely useless because ActiveX is an extremely mature technology but has a lot of vulnerabilities, Java applets are quite rare. ActiveX is exclusive to Internet Explorer and you'll probably only see it on the websites of ancient companies. Most home users don't use IE anymore. So, the Downloaded Program Files file will probably be empty, but if it is, we can still delete all of its contents.
6. LiveKernelReports
Located at C:\Windows\LiveKernelReports

The LiveKernelReports folder is another folder that may appear when you are scanning large files on your computer. This folder is where the dump files (the persistent records of information that Windows keeps). If your computer crashes, you can analyze the contents of these files to begin your troubleshooting.
Any large files that end with the DMP file extension in this folder can be safely deleted. However, like the above locations, the article recommends that you use Disk Cleanup instead of manually deleting the file.
When Windows crashes or you have other mainframe problems, don't delete these dump files immediately. You can use a program like WhoCrashed to get more information.
7. Rempl folder
Located at C:\Program Files\rempl
Although the Rempl folder is not large, you may be surprised to see it appear on your system. It contains some small files and you may even notice a few Task Manager processes connected to it.
This folder is connected to the distribution of Windows 10 updates. It includes "reliability improvements" to help smooth Windows 10 updates and fix compatibility issues.
So can you delete the Rempl folder? There seem to be no side effects from doing so. However, since it only takes up a few megabytes and can make upgrading Windows less frustrating, it's best to keep it.
The best way to delete these folders
We have just mentioned a few items you can delete them but manually deleting is not the best way. Also, you should use a safer automatic cleaning tool. This avoids accidental deletion of necessary files.

Windows Disk Cleanup is very functional and easy to use. For more control, you can also consider third-party cleaning tools like CCleaner that allow cleaning more locations and provide some additional features.
Summary
Windows contains many unnecessary files or folders. Remember, your computers do a pretty good job of keeping themselves clean, so you don't have to delete the contents of these folders unless your computer is low on space. Run the Disk Cleanup tool once or twice a month to keep your computer clean.


No comments:
Post a Comment