Increase font size using this simple guide to increase readability on your Windows 11 PC.
We all love high resolution screens, however, by default, when at high resolutions, text looks a bit squishy and you really need to put in the effort at times when the contrast is low. Reflection is not high or when you simply forget the glasses.
Or conversely, you can often prefer a larger text size on your machine. Although the latest version of Windows has made leaps and bounds in design and improvements. Thankfully, the basics like the process of changing the font size remain largely the same.

Furthermore, since the process isn't much different from previous iterations of Windows, it's pretty easy and straightforward to do on your Windows machine.
Change system font size on Windows 11
1. Open Settings on Windows 11.
2. Click on Accessibility.
3. Click the Text size tab.
4. Use the Text size setting to make the system font smaller or bigger on Windows 11.

5. Click the Apply button.
Once you complete the steps, the system text size will increase or decrease based on your setting on Windows 11.
Tweak Text Cursor and Adjust According to your Font Size
If you can't locate your text cursor after increasing the text size, you can increase the thickness of your cursor or you can even enable pointer indicators to never lose track, you can even change the color of the indicator text cursor to increase visibility if you don't want to resize. You can really tailor the experience to your preferences and desires with loads of options for customizing the text cursor.
1. First. go to the Start Menu and click on the Settings app tile present in the Pinned Apps section of the menu.

2. Then, from the left sidebar of the Settings window, click the Accessibility tab to continue.
3. Then, from the right part of the window, locate and click the Text Cursor box to continue.

4. Then on the next screen you will be able to fully customize the text cursor on your system. From the Text Cursor settings page, you can adjust the color of the text cursor indicator, its size, along the thickness of the text cursor. Furthermore, you can also toggle the text cursor indicator if you don't want to increase its size but also don't want to affect its visibility.
5. To increase the cursor thickness, on the 'Text Cursor' settings page, find the 'Text Cursor Thickness' section on the page. Then drag the slider to the right to increase its thickness. You should be able to measure the thickness of the cursor from the 'Preview Text Cursor Thickness' section. Once you've achieved your desired thickness, let go of the slider and the tweak will be applied immediately.

6. Then if you don't want to increase the thickness of the cursor but also don't want to affect its visibility you can enable the text cursor indicator which is basically a colored teardrop appearing at both ends of the cursor to help it display around larger font sizes.
7. To enable the text cursor indicator, find the Text cursor indicator box and click the toggle switch present at the far right edge of the cell to bring it to the On position. Once enabled, click the box to expand the section for customization.

8. Now, to increase or decrease the size of the indicator, look for the Size box and the slider by option. Then click and hold the right mouse button and drag the slider to the right to increase the size of the indicator and drag it to the left to decrease the size. When you reach the desired size, release the mouse button to apply.
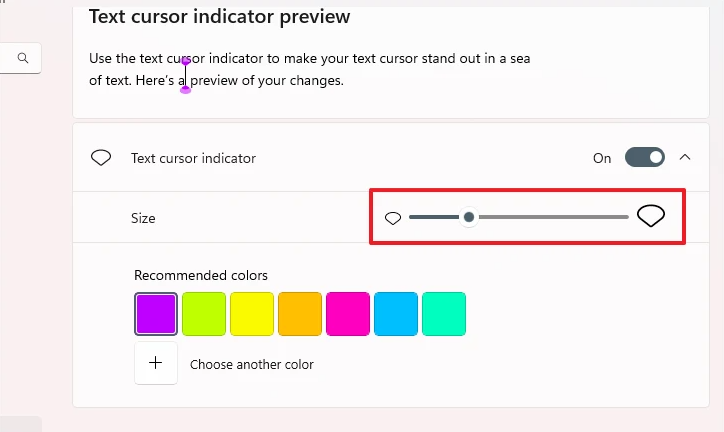
9. To change the color of the indicator, find the 'Suggested colors' section and click on one of the preset color swatch grids. In case you want to choose a color other than the available swatches, click the Choose another color button to choose a color from the color finder in a separate overlay window.

In case you also want to increase the size of everything on your screen, from icons to menus, to text, and don't want to go through each of their settings in turn, you can simply set a custom scaling factor on your system and increase the size of every element relative to their original size without changing the screen resolution.
Set a custom scaling factor to increase the size of icons, menus, and system-wide text
Setting a custom scale factor is a fairly simple process and requires almost no effort on your part. In fact, it hardly requires a few clicks on your part, and you'll be able to zoom in on the screen to get the best possible readability for yourself.
1. To do so, go to the Start Menu and click on the Settings app tile present in the Pinned Apps section.
2. Then on the left sidebar, make sure to select the System tab to continue.
3. Then, from the Display settings page, find the Scale tile present in the Scale & layout section to continue.

4. Then on the next screen locate the 'Custom Scaling' box then enter a value between 100-500 in the text field on the rightmost edge of the cell and then click the 'checkmark' button to confirm Get scale factor customization on your PC. The custom scaling factor will be applied after you log out of your PC and log back in.
Note: Make sure you are increasing the scale factor slightly (by default, the scale factor is 100) as this can negatively interfere with PC navigation.

5. Now, to apply the scale factor to your PC, go to the Start Menu and click on your account photo/initial name to bring up the additional items menu. Then, from the extras menu, click the Sign Out button to instantly log out of your PC.
The custom scaling factor will now be applied as soon as you log into your PC.
That's it, hopefully this guide will help you not only increase the font size on your PC, but also tweak the text cursor for best viewability.


No comments:
Post a Comment