Touchpad operations on Windows bring a lot of convenience. Whether it's a three-finger swipe to switch between active windows or to bring up the desktop, a trackpad can be more useful than a mouse. But sometimes, the touchpad on your laptop can work and stop responding. If you have been a victim of a similar problem, then this guide is for you.

Whether the touchpad is not responding to gestures or not working at all, this guide includes solutions to get the touchpad working again. So let's get started.
1. Restart your PC
You can start by restarting your PC. If the touchpad isn't working due to one of the background processes or a minor software glitch, restarting your PC should fix it.
To restart your PC, you can use an external mouse or keyboard. To restart your PC using the keyboard, press the Start button, use the arrow keys to Power, and press Enter. Now select Restart from the menu and press Enter again.
2. Enable the touchpad using the function key
Every laptop has function keys that give you quick access to turn off wifi, display, or touchpad. They are designed so that you can easily turn off these input devices while in presentation mode. But it is possible that you accidentally disabled the touchpad through these function keys.

You can find this key at the top of your laptop keyboard, mostly mapped by the F9 or F7 keys.
3. Enable the touchpad from Windows Settings
The following troubleshooting method to fix Windows 11 touchpad not working issue is to check and enable the touchpad from native Windows 11 settings on your PC.
1. Launch the Settings app on your Windows 11 PC.
2. Now, select the Bluetooth & Devices option from the left pane.

3. Here, you will see an option for a touchpad if the touchpad option is disabled; simple toggle it on by using an external mouse.

Once done, the Windows 11 touchpad issues should get resolved.
4. Run the Hardware and Devices Troubleshooter
Another way of fixing issues with the hardware components of your system is by running the Hardware and Devices troubleshooter. This utility is specifically designed to scan your system for potential issues that might be causing your hardware to act up.
If any problems are identified, you can apply the fixes that the troubleshooter suggests in a single click. You can use this troubleshooter to fix problems with the keyboard, touchpad, mouse, and other similar components.
1. Press Windows Keys + R together to open Run. Type cmd in the text field of Run and press Ctrl + Shift + Enter to open Command Prompt with administrative privileges.

2. In Command Prompt, type the command mentioned below and hit Enter to execute it.
msdt.exe -id DeviceDiagnostic

5. You should now see the Hardware and Devices troubleshooter dialog on your screen. Click on the Next button in it to start the scan.

6. If the troubleshooter identifies any problem, click on Apply this fix to resolve the problem. If no issues are identified, click on the Close the troubleshooter option and jump to the next method below.

All the programs and processes on the Windows operating system are connected to a relevant service that helps them function as they are supposed to. These services can be found in the Windows Services utility.
If any of the related services are not working, the process related to it will also cease to function. In the case under consideration, several users noticed that the issue was being caused because of two services being disabled; Microsoft Keyboard Filter Service and Tablet PC Input Service.
In this method, we will check if these services are working properly and enable them if they are not.
1. Press Windows key + R to open Run. Type services.msc in the text field of Run and click Enter.

2. In the Services window, look for Microsoft Keyboard Filter and right-click on it.
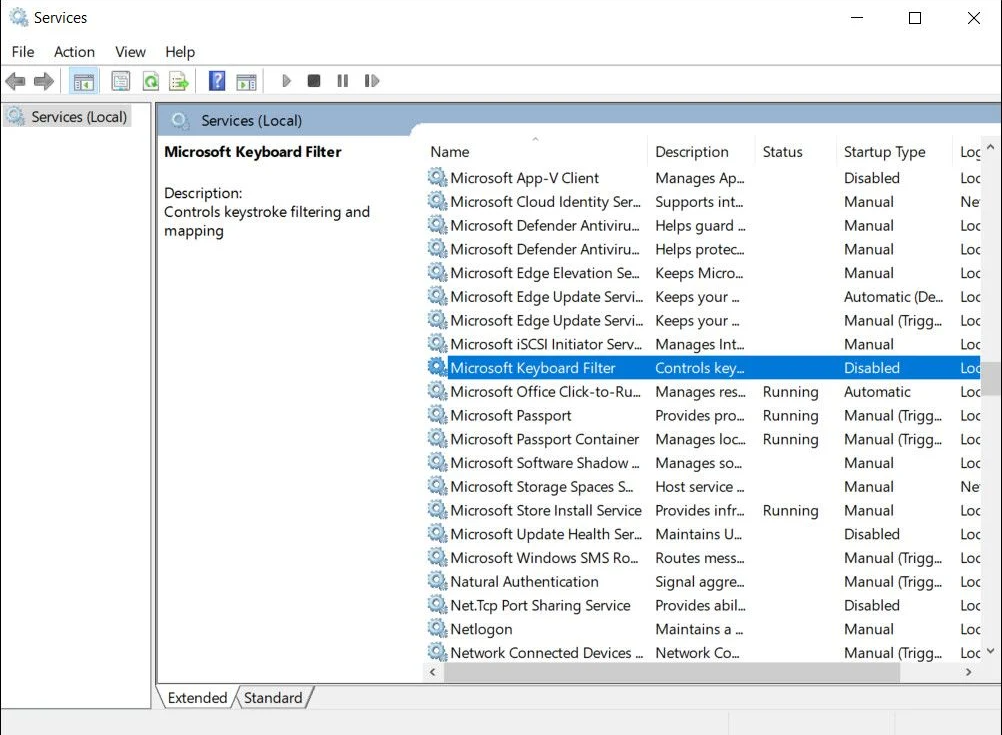
3. Choose Properties.
4. If the service is disabled, click on the Start button.
5. Perform the same steps for the Tablet PC Input Service.
Once done, check if you can use your touchpad or trackpad without any problems now.
6. Check and update Touchpad Drivers
If your touchpad stopped working after you upgraded to Windows 11, there is a good chance that the current touchpad driver is not compatible with the latest operating system version.
If this is true in your case, you will see a yellow exclamation mark associated with the touchpad driver in the Device Manager. That is a signal that something is wrong with the driver and that you should update or reinstall it immediately.
1. Type Device Manager into Windows Search and click Open.
2. In the following window, expand the Keyboard section.
3. Locate your keyboard driver (it will most likely have a yellow exclamation mark) and right-click on it.
4. Choose Update driver from the context menu.

5. In the next dialog, click on Browse My Computer for drivers > Let me pick from a list of available drivers on my computer.
6. Choose the 2C HID Device option and click Next. If you cannot locate this option, you have the choice to either download it online or simply click on whichever driver is available.
7. After the driver is updated, close the Device Manager and check if the problem is fixed.
Hopefully the above troubleshooting methods will help you to use your trackpad/trackpad again without any problems. To prevent any problems like this in the future, you need to make sure of two things; Always keep your touchpad clean and driver up to date.


No comments:
Post a Comment