If your Zoom camera is not working, this article can help you to fix it. Some users have complained that their camera has stopped working on the Zoom app, while some users say that their camera shows a black screen when using the Zoom app. If the same thing is happening to you, you can try the solutions explained in this article in no particular order and see if they help.

Why is my camera not working with Zoom?
Your camera will not work with the Zoom feature if you have denied access to it. In Windows 11/10, there is a feature that allows users to choose which apps can use the camera and which can't. To work around this issue, check that you've given the camera Zoom access. Another cause of this problem is outdated or corrupted camera drivers. In this article, we have explained the solutions to get rid of this problem.
A. Check if Zoom is using the right camera
You have to check if Zoom is using the right camera or not.
1. Open the Zoom app on your computer.
2. On the left-hand side of the application, click on New Meeting.
A new video session will be started.

3. Now, on the bottom-left corner, click on Stop Video.
4. In the elevated panel, check if the Zoom app is using the right camera (If you are using a laptop there will be a tick mark beside Integrated Webcam).
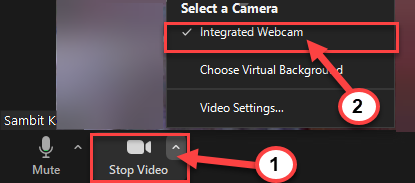
5. To close the video session, click on End.
Re-launch the Zoom app and start a video session. Check if the camera is working.
B. If you are using Zoom on Chrome
1. Open Chrome browser.
2. Go to chrome://settings/privacy
3. Click on Site Settings

4. Click on Zoom website url.

5. Select Allow from Dropdown on Camera

6. Now, refresh chrome browser, or close it and then again open it.
C. Using Zoom Troubleshoot
1. Launch the Zoom application from your computer.
2. Click the gear icon to open the Zoom settings.

3. On the left side, click Video.
4. Now, scroll down to the right hand side of the same window and click on troubleshooting.
5. Make sure you have followed all the instructions on that list.
- Make sure you have a webcam plugged in (Not applicable if you are using a laptop).
- Make sure that the webcam is not being used by another application (like Skype). If another application uses the webcam, end the application. Relaunch the Zoom app.
- If nothing works, restart your computer.

6. If everything is OK but the camera still won't work, proceed to the next repair.
D. Modify video settings Zoom
1. Launch the Zoom application from your computer.
2. Click the settings icon in the upper right corner in the Zoom app.
3. In the Settings window, on the left side, click Videos.
4. Then, click Advanced in the bottom right corner.

5. Now, on the right side, check the option
- Enable de-noise.
- Enable acceleration for video processing.
- Enable acceleration for sending video.
- Enable hardware acceleration for receiving video.

6. Similarly, you must set all other three settings to Auto.

7. Once you have successfully changed the settings, close the Settings.
Relaunch the Zoom app. The camera must work properly.
E. Check Camera Permissions
A. For Windows 10
1. Type Camera privacy settings in the Search box right next to the Windows icon.
2. Now click on Camera Privacy Settings in the advanced search results.

3. In the Allow access to the camera on this device section, click Change.
4. Turn on Camera access for this device.

5. Scroll down in Settings, enable Allow desktop apps to access your camera
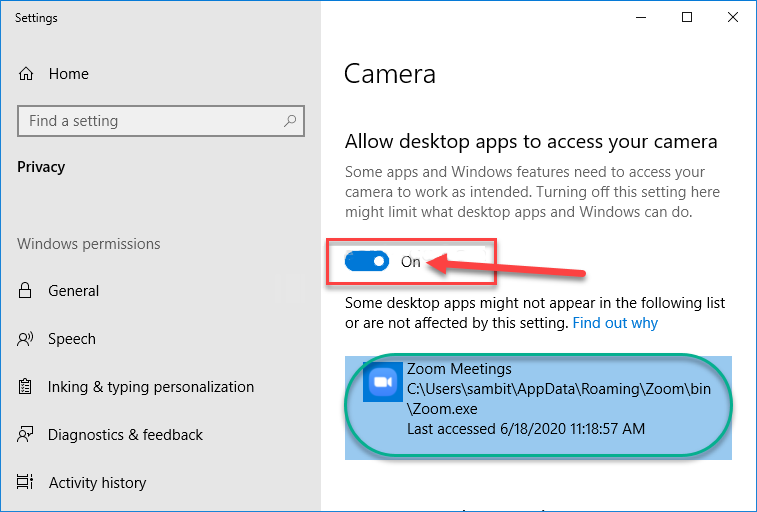
6. Close the Settings window.
Try opening the Zoom app and test the camera.
B. For Windows 11
1. Press Windows Keys + I combination to open settings.
2. Now click on Privacy & Security from the left menu.
3. Now, click on the camera from the right side.

4. Turn On both camera access and Let Apps access your camera option.

5. Also make sure If zoom is in the list and its camera access is ON.
Video:

Hope this helps.


No comments:
Post a Comment