All computers and routers are provided with an IP address to help users access the Internet. Similar to Wifi Routers, Internet service providers (ISPs) provide IP addresses for all Wifi Routers to support users to conect to the Internet on their service.
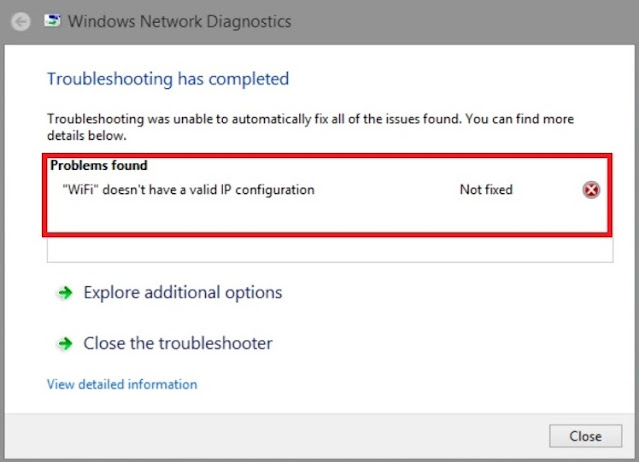
However, in some cases, if the system's IP address (Internet Protocol) is misconfigured, it will cause the error WiFi doesn't have a valid IP configuration or Ethernet doesn't have a valid IP configuration or “Wireless network doesn't have a valid IP configuration”.
Usually there are 3 main causes of the WiFi doesn't have a valid IP configuration error on your Windows 11/10 computer: router error, wrong IP address assignment error and finally an error on the NIC.
A. Restart the computer
Like most problems, the first troubleshooting step you need to do is restart your computer. You may see the message WiFi doesn't have a valid IP configuration due to a temporary glitch. Before spending time on more in-depth fixes, it's a good idea to do a quick reboot first.
If you reboot and still see this error, continue with the other options below.
B. Restart the Router or Modem
If applying the above method still does not fix the error, you can try restarting the Router or Modem to fix the WiFi error doesn't have a valid IP configuration or fix the Ethernet error.
Simply turn off your Router and wait for about 5 minutes. Then proceed to turn on the Router again and check if the WiFi error doesn't have a valid IP configuration still or not.

C. Run Windows Troubleshooter
Next, try running the Windows Troubleshooter to detect and fix the problem.
1. Use the keyboard shortcut Win + X to open Settings on a Windows PC.
2. Go to Network & Internet.
3. Select Status from the left sidebar and click on Network troubleshooter in the right panel.

4. Wait for the troubleshooter to identify the problem and provide a solution.
D. Temporarily disable anti-virus software
Many Windows 11/10 users recommend temporarily disabling anti-virus software as it may prompt Windows to assign a valid IP. Whether you're using Windows Defender or a third-party antivirus, consider disabling it, then restarting the computer to resolve the issue.
E. Check the network card settings (Network Adapter)
1. Press the Windows + R key combination to open the Run command window.
2. Enter the command below into the Run command window and then click OK or press Enter to open the Network connections window: ncpa.cpl
3. In the Network connections window, right-click the network connection you are using, select Properties.

4. On the Properties dialog window, find and select the Internet Protocol Version 4 (TCP/IPv4) option and then click Properties.

5. Next, check Obtain an IP address automatically and Obtain DNS server address automatically.

6. Click OK and you're done.
F. Reset TCP/IP Stack
Winsock or Windows Socket is the set of data that programs use to access the internet. In case its settings have been modified or a part of the data has gone corrupt, resetting it will help fix the issue. You will again need to run a few commands in an elevated Command Prompt to reset the TCP/IP stack.
1. Search for Windows Terminal in the Search menu, right-click on the relevant search result and select Run as administrator to open an elevated command prompt. Click Yes on the UAC box that appears

2. In the Command Prompt, type or paste the following command and press ENTER to execute it. netsh winsock reset catalog

3. Next, type or paste the following command and press ENTER to execute it.
netsh int ipv4 reset reset.log

4. After the earlier command is executed, enter the following command and press ENTER to execute it. netsh int ipv6 reset reset.log

5. After executing the three commands, restart your computer and check if the WiFi Doesn’t Have a Valid IP Configuration error is fixed.
G. Release/Renew IP Address
This is one of the most common fixes known to resolve issues pertaining to the IP address. You just have to run a couple of commands in the Command Prompt.
1. To release and renew the IP address, enter Windows Terminal in the text field of the Search Menu and click on the relevant search result to launch the app.
2. Now, in the Command Prompt tab, type or paste the following command and press ENTER to execute it. ipconfig /release

3. Wait for the command to be executed. Once it’s done, type or paste the following command and press ENTER. ipconfig /renew

4. Now, close the Command Prompt and check if the error is fixed. If not, restart the computer and verify again.
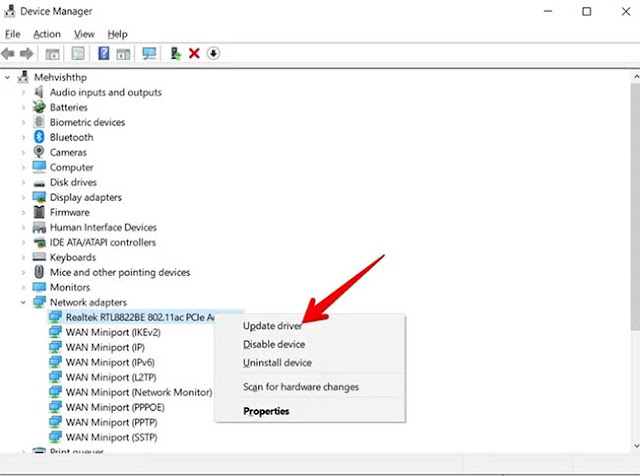
I. Update the wireless network adapter
1. Open Device Manager using the Windows search function.
2. Expand the Network adapters section. Right-click the wireless adapter and select Update driver. Follow the on-screen instructions to complete the process.
J. Reinstall Network Adapter
1. Press the Windows + R key combination to open the Run command window. Then enter the command below and then click OK or press Enter to open the Device Manager window: hdwwiz.cpl
2. On the Device Manager window, expand the Network adapters option and note the name of the network card you are using.
3. Right-click the Ethernet card you are using, select Uninstall.

4. Next, click Action and then select the option named Scan for hardware changes.

Searches will be performed and your network card interface will be added. You can now run the Windows Network Diagnostics or Network Adapter troubleshooting tool to see if the error has been resolved.
K. Reset Network Settings
1. Go to the search function located at the bottom of the page, then search for and select Settings
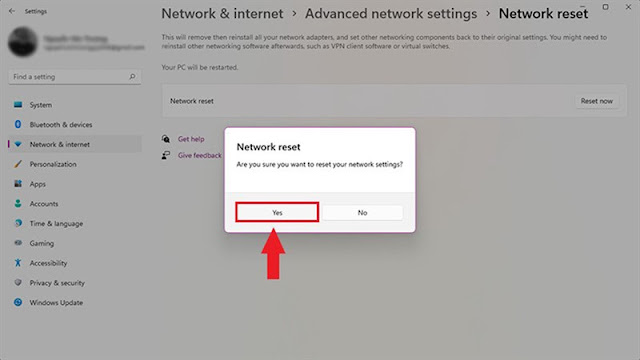
2. Find and select Network & Internet on the left sidebar. Select Advanced network settings.

3. In the following window, select Network reset.

4. The following page will give you a detailed description of what will happen once you reset everything. Once you’ve read it, select Reset now.

A small window will ask if you are sure if you want to reset all the network settings. Select Yes.
After a few minutes, Windows 11 will reboot and all your network adapters will be reset to their factory settings.
Video:


No comments:
Post a Comment