Microsoft Defender also known as Windows Security on Windows 11. Windows Defender is an anti-virus software available to provide security from threats, viruses, malware, trojans, spyware spyware and ransomware. This is one of the best antivirus solutions for Windows 11 but some may not like its interruption in some cases, hence want to disable Windows Defender services.
Windows Defender continuously scans the files in the PC and will acquire 25% of the resources. Can sometimes cause high CPU or Memory usage warning in task manager. Sometimes it is also responsible for automatically deleting recently downloaded files due to real-time threat alerts. You may need an urgent file from the internet but Windows Defender won't let that file through it's completely secure. In such situations, you should disable Microsoft Defender and its firewall on Windows 11.
You cannot uninstall Windows Defender from Windows 11 but we have also covered an option to permanently terminate its services. Permanent removal will simply disable Defender root from Windows 11.
A. Disable Microsoft Defender Realtime Protection
1. Press Windows + I Key to open Settings.
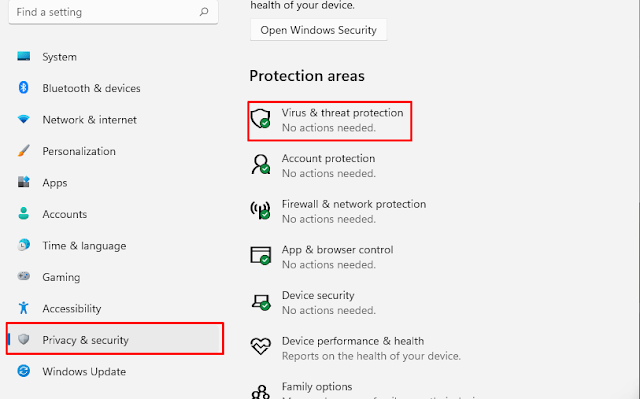
2. Click Privacy and Security. Select Windows Security from the right pane
3. Click Virus & threat protection.4. Click on Manage settings5. Under Real time protection section, click the toggle switch.
6. User Account Control will be prompted, click YesNote: To re-enable click the same toggle switch.
B. Disable Real-Time Protection Using the Group Policy Editor
Windows 11 Group Policy Editor manages all system and external application services. Even Windows Update, Microsoft Edge, Widgets and Windows Defender services can be changed from the Group Policy Editor. Microsoft introduced the Group Policy Tool to manage administrator permissions for applications across a group of computers or an organization, but it is very well used to uninstall Microsoft Edge and system apps. Other Windows 11.
Microsoft Defender can be easily disabled and permanently uninstalled just by changing a single file value. Furthermore, Windows Defender will not interrupt until you manually undo the changes
- Open the Start menu > Settings.
- Privacy & Security > Windows Security
- In the Protection Areas section, select Virus & Threat Protection
- Under Virus and Other Threat Protection Settings, select Manage Settings.
- Set Tamper Protection to Off.
6. Press Windows + R to launch RUN dialog and enter gpedit.msc to open Local Group Policy Editor
7. Maximize the Window and expand the Administrative Templates under the Computer Configuration
8. Expand the Windows Components and scroll down to the Microsoft Defender Antivirus
9. Double click on the Turn off Microsoft Defender Antivirus file on the right panel
10. Change from the Not Configured to the Enabled option and Apply.
11. Restart your Computer
C. Disable Microsoft Defender antivirus in Windows 11 using Registry Editor1. First of all, launch Microsoft Defender (Windows Security) from the system tray or Settings. Then, select Virus & threat protection from the left pane and click Manage Settings under Virus & threat protection settings
2. Now turn on/off in all settings in Windows Security. When you turn off the toggle for Real-Time Protection, you may see a UAC prompt, click Yes to continue. Then disable Cloud Delivered Protection, Automatic Sample Submission, and Temperature Protection. We need to do this to disable Microsoft Defender in Windows 11
3. Now, we need to make some changes in the Windows Registry. So search for registry editor in the search box on Windows 11 and select Run as administrator.
4. Now, go to the Microsoft Defender Antivirus registry key in the Registry Editor. You can also paste the following path into the Registry Editor's address bar.
HKEY_LOCAL_MACHINE\SOFTWARE\Policies\Microsoft\Windows Defender
5. Here, select Windows Defender and right click on an empty space in the right pane. Now select New > DWORD (32-bit value) to create a new DWORD to disable Microsoft Defender (Windows Security) Antivirus in Windows 11
6. Name the newly created DWORD as DisableAntiSpyware and double click on it to modify its value. Now set the value data to 1. Then click OK to save the changes.
7. Now, close Registry Editor and restart your computer.
NOTE: If you ever want to re-enable Microsoft Defender, simply remove the DisableAntiSpyware registry DWORD from the Registry. Then restart your computer and Windows Security should start working again.
Vdeo:


No comments:
Post a Comment