Windows 11 comes with an improved clipboard that allows copying multiple items to the clipboard and pasting them if needed. However, the Copy Paste function may stop working on Windows 11 computers.
This problem may occur due to corrupt system files or a temporary problem with Windows File Explorer. Below are some troubleshooting steps to restore Copy Paste functionality in Windows 11.
1. Delete clipboard data
If conflicting data formats and corrupted data are causing problems, clearing clipboard data may help. Doing so will clear the clipboard history, except for pinned items.
To do this, press Win + I to open Settings and go to System > Clipboard. Click the Clear button next to Clear clipboard data to clear the history.
If the problem persists, perform a quick restart to refresh hardware components as well as Windows services and applications to fix temporary problems with the computer.
2. Perform a clean boot
You can perform a clean boot to determine whether a third-party application conflict is causing the Copy Paste function to malfunction. Third-party application conflicts are one of the common factors that contribute to this problem.
In clean boot mode, Windows starts with a minimal set of drivers. To do this, you will need to manually turn off all unnecessary services and startup programs, and then restart your PC. To perform a clean boot:
1. Press Windows Key + R to open Run.
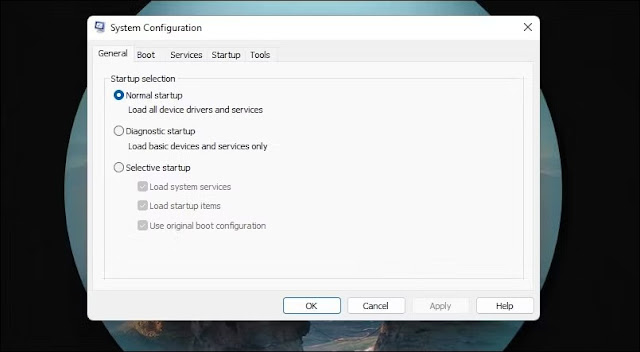
2. Enter msconfig.msc and click OK to open System Configuration. You can also search for system configuration in Windows Search and open the application.
3. In the System Configuration window, open the Services tab.
4. Check the Hide all Microsoft services box. This will hide all the essential system services needed so you don't accidentally disable them.
5.Click the Disable All button to turn off third-party services.
6. Open the Startup tab and click Open Task Manager.
7. Task Manager will open in the Startup tab.
8. Select all Startup applications one by one and click Disable.
9. Once you have disabled all startup applications, return to the System Configuration dialog box.
10. Click Apply > OK to save the changes.
11. Click Restart to restart your PC in Clean Boot mode.
After rebooting, see if you can Copy Paste successfully. If the problem is fixed, then it can be concluded that a third-party application caused it. To find the app that's causing the problem, open Task Manager and start enabling each startup app until you find the problematic app.
If the problem persists in clean boot mode, proceed to the next steps. Before that, enable all disabled services in System Configuration.
To disable clean boot mode and start Windows normally, open the System Configuration utility, go to the General tab, then select the Normal startup option.
Click Apply > OK to save the changes. When prompted, click Restart Now to restart the computer.
3. Update Windows
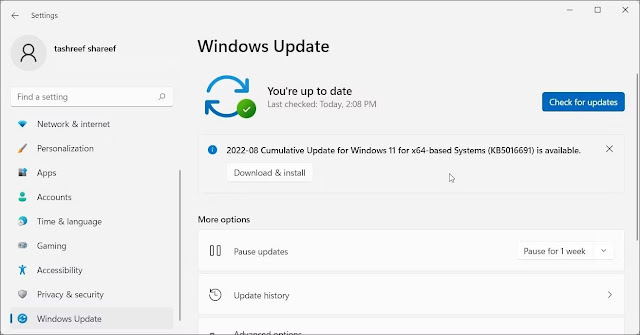
If the clipboard problem is caused by a known Windows 11 bug, check the Windows Update tab to see if a new patch or fix is available.
To install Windows updates:
1. Open Start and click on Settings.
2. Next, open the Windows Update tab in the left pane.
3. If you don't see pending updates, click on Check for updates. Windows will look for new updates and list them accordingly.
4. Install all critical updates and restart your PC.
4. Restart File Explorer
File Explorer helps navigate through folders and browse files on Windows. Since this is an integral part of the Windows graphical user interface, restarting the File Explorer process can help restore Copy Paste functionality in Windows 11.
To restart File Explorer:
1. Press Windows Keys + X to open the WinX menu.
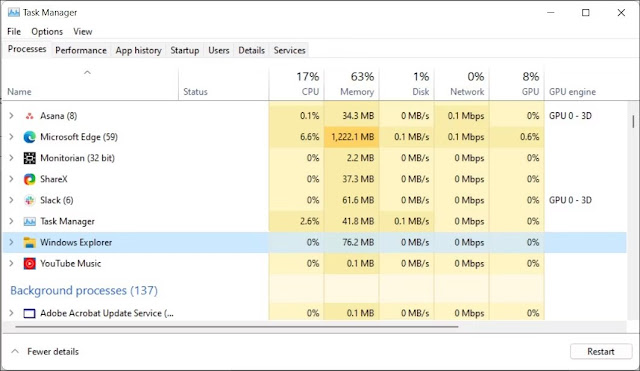
2. Click on Task Manager to open the app.
3. In the Processes tab, locate and select Windows Explorer.
4. Next, click on Restart to restart the process. Your screen may flicker when File Explorer restarts.
5. Run Keyboard Troubleshooter
Windows 11 has a built-in Keyboard Troubleshooter to find and fix common problems. It fixes problems triggered due to malfunctioning drivers and incorrect keyboard configuration.
To run Keyboard Troubleshooter:
1. Press Windows Keys + I to open Settings.
2. In the System tab, scroll down and click Troubleshoot.
3. Next, click Other troubleshooters.
4. Scroll down to Keyboard and click Run. Wait for the troubleshooter to detect and fix any problems with the keyboard.
Keyboard Troubleshooter may not be available on Windows 11 23H2 or later. If so, it should be possible to run it using Command Prompt.
So click Start, type cmd and click to open Command Prompt from the search results. In Command Prompt, type the following command and press Enter:
msdt.exe /id KeyboardDiagnostic
In the Keyboard Troubleshooter dialog box, click Advanced, select the Apply repairs automatically option, and click Next. The troubleshooter scans your computer for known keyboard problems and tries to fix them automatically.
6. Reset the rdpclip.exe process
If the Copy Paste function does not work when using Remote Desktop Connection, restarting the Rdpclip.exe process can help copy and paste text and files between the local computer and the remote computer.
To restart the rdpclip.exe process, press Win + X and select Task Manager. In Task Manager, open the Task Manager tab and find the rdpclip.exe process. To end the process, right-click rdpclip.exe and select End task.
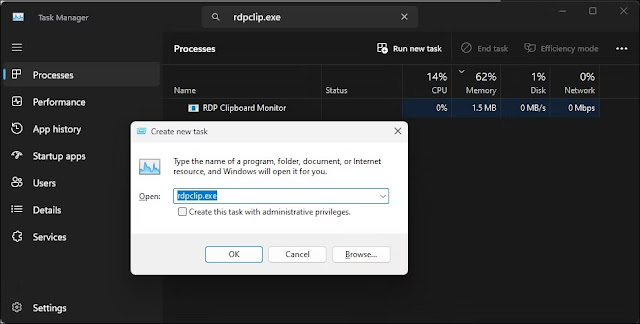
To restart the process, in Task Manager, click Run new task, enter rdpclip.exe and click OK.
7. Check the keyboard for hardware problems
If you have remapped your keyboard keys on Windows, make sure the Ctrl + C / Ctrl + V shortcut is set correctly. Also, look for problems with the Ctrl key. Keyboards can have multiple Ctrl keys. Try using the additional Ctrl key at the bottom right of the keyboard to Copy Paste. If it works, maybe the left Ctrl key is faulty.
8. Run System File Checker
If the keyboard is active, scan the system for potentially corrupt system files. The built-in System File Checker and Deployment Image Service and Management tools can find and fix system-level errors.
To run the System File Checker tool, open the Command Prompt as Administrator and execute the commands:
1. Press the Win key, and type cmd.
2. Right-click on Command Prompt and select Run as administrator.
3. In the Command Prompt window, type the following commands one by one and press Enter:
DISM /Online /Cleanup-Image /RestoreHealth
Sfc /scannow
4. First, DISM will scan and repair the Windows image. Then System File Checker will begin the verification phase. It will scan for all protected system files and replace corrupted or missing files. This process may take some time, so wait till the verification is 100% complete.
Reference: Use the SFC scannow command to fix Windows system file errors and How to repair Windows images with DISM for details on how to use these two tools.
9. Create a new local user account
You can create a new local user account in Windows 11 to check if the problem is limited to the current user. You can create a new local user account in Windows 11 using the Accounts option in the Settings app.
Once done, log in to your new local account and try copy and paste. If it works, you can try editing the previous account again or continue using the new local account.
If none of this helps, try repairing and installing Windows 11. This involves performing an in-place upgrade to reinstall the operating system without affecting system settings or files.






No comments:
Post a Comment