Zip files are perhaps the most popular archive file format in the world. We all have had to deal with them when using a computer. That’s why it can get really annoying when we try to extract one just to be met with an error.
Windows cannot complete the extraction and The compressed (zipped) folder is invalid are two of the most common errors you’ll face when dealing with a zip file on Windows.

Why Windows cannot complete the extraction? There are a couple of variations of the error you can face when trying to extract folders – the destination file couldn’t be created or the file name(s) would be too long for the destination.
1. Restart your Windows 11 or 10 computer
1. Click on the windows logo and select restart
2. Wait for your windows computer to restart successfully then go ahead and try to extract or unzip the zipped folder or file.
If there are any minor problems, simply restricting your windows 11 or 10 computer will fix the Windows Cannot Complete the Extraction Error in Windows 11.
2. Move the file to another location
Windows could not complete the extraction. The failure to create the target file usually occurs because the file is in a protected area. In this case, all you need to do is move the compressed files somewhere else. Try to extract them now.
3. Download the file again
There may have been a problem when you downloaded the file. It is possible that something happened during the download and the end result is that the file is corrupted, which can also affect whether it can be unzipped.
4. Download a third-party extractor
Sometimes you try to extract a ZIP file but for some reason you get the error “Windows Cannot Complete The Extraction” when you use the default extractor built into Windows.
In this case, you may want to try downloading a third-party extraction tool like 7-Zip to use for free. Using it is simple - just download the tool and open your ZIP file with 7-Zip and you're good to go.
5. Change file name
If the zip file has a too long name then you need to rename the zip folder or filename to a shorter name and extract the file.
6. Run System File Checker and CHKDSK
If you find yourself unable to extract any compressed file, the problem undoubtedly exists in some of your system files. Perform the following steps to run SFC and CHKDSK.
1. Press Windows Key + X. Click on Command Prompt (Admin).
2. Type either sfc /scannow or sfc /scannow /offbootdir=c:\ /offwindir=c : \windows if the former fails.

3. Once you're done, restart the PC. Follow the first and the second step again. Type CHKDSK /f /r. Press Enter and let the process run. Then, restart your computer again.

After performing all the steps, you'll likely be able to extract the files. If the issue still persists, try to use the following methods.
7. Perform Clean Boot
If your computer is still not able to extract the files, there might be a conflict between different software.
1. Start by holding the Windows + R keys. A new prompt will appear with a Run dialog. Then, type MSConfig and press Enter.
2. A new prompt will appear. Click the general tab and choose the following option Selective Startup.
3. .Make sure that the option Load Startup items is unchecked.

4. After that, go to the general tab and check the option Hide All Microsoft Services and then click Disable All.
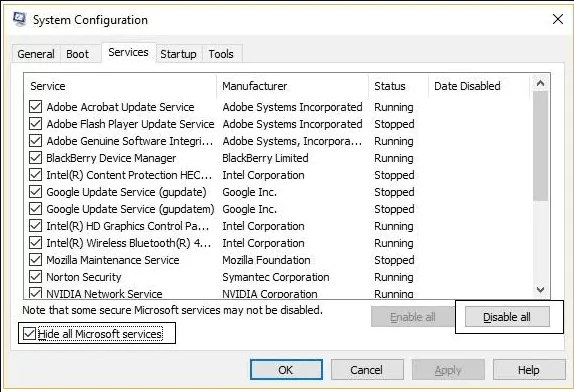
5. Restart the computer, and you'll be good to go.
Why Windows Cannot Complete the Extraction Error in Windows 11 or 10
This can be due to corrupted zip file or it can also be due to software which you are extracting is unable to extract the file and if the file is damaged or corrupted or also due to folder extraction permissions (encryption file system permissions issues).


No comments:
Post a Comment