Video RAM or VRAM is the amount of additional RAM dedicated to the video and graphics performance of your system. It is important to have VRAM on your PC as it contains the information needed for its own processing by the PC's GPU (Graphics Processing Unit). The more VRAM, the faster and more your video data will process like lightning effects, game textures, etc. VRAM is owned by the system's GPU, which you can check anytime you want. Checking your PC's VRAM is a good way to track your PC's path. It is also useful in case you get unusually low frame rates in games etc. So, this is how you can test video RAM on Windows 11 and 10.
How to check Video RAM (VRAM) on Windows
There are a number of ways by which you can check the Video RAM of your PC and also its live usage.
Method 1: Check VRAM using Settings
The first way to check the VRAM of your Windows System is by using the Windows Settings app.
On Windows 11
1. Search and open Settings on your PC. You can also press Windows Keys + I on your keyboard to open settings.
2. Once the settings windows is open, go to System and select Display.
3. This will open the Display settings windows. Scroll down to Related settings section and click on Advanced display option.
4. Now on the Advanced display settings window, scroll down to Display information section and click on the Display adapter properties for Display 1 option.
5. A new popup window of Display adapter properties will appear. Switch to the Adapter tab of that window and your Video RAM or VRAM capacity will mentioned there by the option Dedicated Video Memory.
On Windows 10
1. Open Windows Settings by pressing Windows Key + I on the keyboard.
2. Go to System > Display.
3. Now, scroll down to Multiple displays section and click on Advanced display settings option.
4. On the Advanced display settings window, scroll down and go to Display adapter properties for Display 1.
5. This will open a new display adapter properties window where your Video Memory will be listed by the name Dedicated Video Memory.
Video:
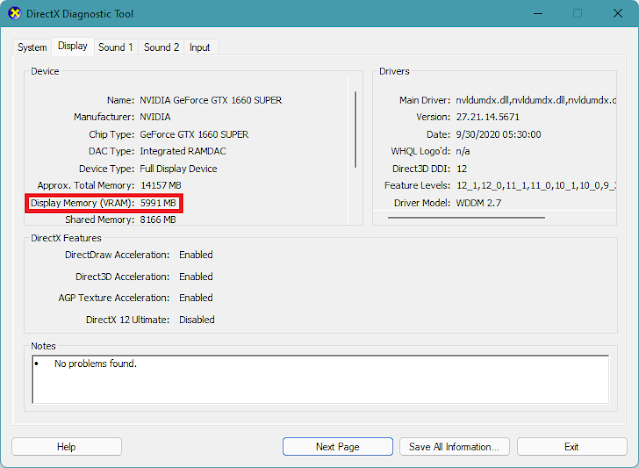
Method 2: Using the DirectX Diagnistic Tool (DXDIAG)
You can use the built-in DirectX Diagnostic Tool on your Windows PC check the Video RAM.
1. Open the Run dialog box by pressing Windows Key + R on your PC. Type-in dxdiag in the Run dialog box and click on OK.
2. This will open the DirectX Diagnostic Tool on your PC. Now in the tools window, switch to the Display tab.
3. Here under the Display tab, look for Display Memory (VRAM) option under the Device section. Whatever amount mentioned next to that option is your Video Memory.
Method 3: Use 3rd party apps
Finally, you can use any trusted 3rd party app like CPU-Z. I personally use this app because it's free, reliable, and regularly updated. Not just Video RAM but CPU-Z can tell you anything you want to know about your PC hardware.
2. Once downloaded, install the app like any other regular 3rd party app on your PC.
3. Once the installation is done, open the CPU-Z application on your PC and switch to the Graphics tab.
4. In the graphics tab, your Video Memory size will be listed there in the Memory category next to the Size option. If your PC is using the integrated GPU, almost nothing will be mentioned there.
Conclude
So this is how you can use to test your Windows System's video RAM. Checking VRAM on Windows 10 or 11 doesn't make much difference and it's easy too. I have mentioned 3 different ways to test Video Memory and you can use any of them according to your convenience. If you know about your PC and know that there is an integrated GPU in your PC, then it is better to use the first or second method because applications like CPU-Z may not be able to display the VRAM. share is being used by the integrated GPU. However you have a dedicated GPU in your system, any method will work for you.
%20You%20Have%20In%20Windows%201110.jpg)
%20You%20Have%20In%20Windows%201110-1.png)
%20You%20Have%20In%20Windows%201110-2.png)
%20You%20Have%20In%20Windows%201110-3.png)
%20You%20Have%20In%20Windows%201110-4.png)
%20You%20Have%20In%20Windows%201110-5.png)
%20You%20Have%20In%20Windows%201110-6.png)
%20You%20Have%20In%20Windows%201110-7.png)


No comments:
Post a Comment