Randomly appearing PowerShell windows can be quite annoying. But it's even more frustrating not knowing what is causing this problem.

In this article, I will take a detailed look at this weird PowerShell issue, what causes it, and all the possible solutions you can do to fix it.
1. Remove the PowerShell shortcut from the Startup folder
Your Windows device has a folder named “Startup folder”. All shortcuts or apps in this folder will run as soon as you start your device.
Now, PowerShell will also run at startup if its shortcut is in this folder. To work around this issue, delete the PowerShell shortcut from this folder as follows:
1. Press Windows Key + R to open the Run dialog box.
2. Type %ProgramData%\Microsoft\Windows\Start Menu\Programs\StartUp and press Enter.

Locate and delete the PowerShell shortcut from the Startup folder.
2. Disable PowerShell Startup Status on Task Manager
This problem can also be caused by the way you have configured some settings. For example, PowerShell Startup Status can be enabled in Task Manager.
So let's see how you can disable PowerShell Startup Status on Task Manager:
1. Press Ctrl + Shift + Esc to open Task Manager.
2. Navigate to the Startup tab.
3. Right-click the Windows PowerShell option and select Disable. Finally, close the Task Manager and restart the device.

3. Disable PowerShell Startup Status with Autoruns
Sometimes it's hard to tell if PowerShell is configured to run at startup.
In this case, you can use a tool called Autoruns. This feature helps you identify apps that run immediately when you turn on your device.
1. Download Autoruns from Microsoft website.
2. Run the program and navigate to the Logon tab.
3. Find PowerShell from the options and then uncheck its corresponding box. For example, the image below shows how you would do this for the OneDrive app.

Finally, close the Autoruns program and restart the device to save these changes.
4. Perform a Basic Scan on Your Device
In some cases, this error might be caused by some corrupted system files. To resolve the problem, you can perform a simple scan using the Check Disk (CHKDSK) tool.
1. Press Win + R to open the Run command dialog box.
2. Type CMD and press Ctrl + Shift + Enter to open an elevated Command prompt.
3. Type the following command and press Enter:
chkdsk C: /f
The C: command represents the letter of your PC’s hard drive. So, make sure that this command matches the letter displayed next to your hard drive.
Run the scan and then restart your device to save these changes.
Run an Advanced Scan on Your Device
Computer Security scanner illustration
If the Check Disk scan didn't help, then you need to take a different approach. For example, you could now run an advanced scan using the DISM and SFC tools. These two features are helpful when it comes to fixing or replacing faulty system files.
1. Type Task Manager in the Start Menu search bar and select the Best match.
2. Click the File tab and select Run new task.
3. Type CMD and then check the Create this task with administrative privileges box.
4. Press OK to run an elevated Command Prompt.
5. Next, type the following command and press Enter to run the DISM scan:
DISM /Online /Cleanup-Image /ScanHealth
When you're done running this command, type the following command and press Enter:
DISM /Online /Cleanup-Image /RestoreHealth
From there, restart your device to save the changes. Next, run an SFC scan through these two steps:
1. Open an elevated Command Prompt by following the previous steps.
2. Type the following command and press Enter to run an SFC scan:
sfc /scannow
Once the scan is complete, close the Command Prompt window and then restart your device.
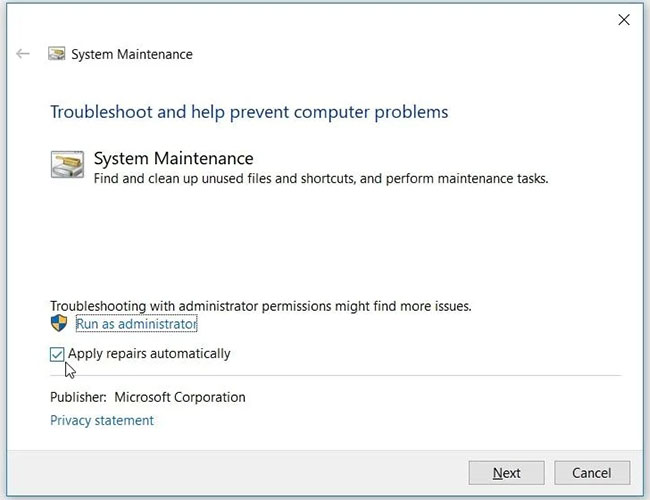
5. Run the System Maintenance troubleshooter
Perhaps this is a problem you can solve with one of the built-in debuggers. In this case, the article will assume that this error is caused by a system maintenance problem. So an easy way is to use the System Maintenance troubleshooter.
1. Press Windows Keys + R to open the Run dialog box. Type msdt.exe -id MaintenanceDiagnostic and press Enter.
2. Next, click the Advanced option in the System Maintenance troubleshooter window. From there, check the Apply repairs automatically box and click Next.

3. Reboot the PC
6. Update Windows
A simple Windows update might be one of the best solutions to this problem. That’s because the latest features could get rid of the system bugs that cause this error. Now, the best part is that this will also take care of other system problems.
1. Press Windows Keys + I to open the System Settings.
2. Click Update & Security and select the Windows Update option.
3. Finally, press the Check for updates button on the right and follow the on-screen instructions.
7. Temporarily disable Windows PowerShell
If you still cannot resolve this issue, then you can consider disabling Windows PowerShell temporarily. Besides, you can always run your commands using Command Prompt. And even if Command Prompt isn't a good fit, there are plenty of other Command Prompt alternatives to try.
1. Open the Start menu search bar and type CMD. Right-click Command Prompt and select Run as administrator.
2. Type the following command and press Enter:
Dism /online /Disable-Feature /FeatureName:"MicrosoftWindowsPowerShellV2Root"
Wait for the process to complete and then restart your device.
In case you want to re-enable PowerShell, here's what you can do:
1. Open Command Prompt according to the previous steps.
2. Run the following command and press Enter:
Dism /online /Enable-Feature /FeatureName:"MicrosoftWindowsPowerShellV2Root"
PowerShell is a handy tool that you can use for various purposes like automating PC tasks. However, it's annoying that the PowerShell window keeps popping up randomly.
So, if PowerShell continues to randomly show up on your screen, try any of the tips mentioned above.


No comments:
Post a Comment