On Windows 10, Microsoft no longer integrates the option to turn off updates completely, but the update process will take place automatically. Now to turn off Windows 10 update, prevent Windows 10 from automatically updating or turn off the automatic update feature on Windows 10, you will have to do it manually.

For most users, Windows Update will slow down the system, can cause incompatibility errors, when you need to shutdown, you have to wait for Windows to update for a long time and it's frustrating... How to turn off automatic updates on Windows 10! Because Windows 10 is constantly updating, if method 1 doesn't work, you can try method 2, 3...
1. Turn off updates on Windows 10 with services.msc
I always use this method to turn off Windows 10 updates, tested on Education and Pro versions are OK, but it has the disadvantages I mentioned below, you should do it in combination with method 2 for the best effect.
1. Press Windows Keys + R to open run. Type services.msc and press Ente

2. Find the Windows Update section (scroll down near the bottom), double-click it to open the Properties

3. At the General tab, click Stop under Service status, then find Startup type and click the arrow in the box and select Disabled.

4. Click OK to save the changes, restart the computer and check the Windows Update feature again.

Note: If you do it this way, Windows Defender will not be able to Update anymore, it will be quite dangerous if your computer does not install any additional anti-virus software for Windows. If you just want to delay updating Windows 10 in the Startup Type section, you can choose Manual to update it manually (it says an update is available, but you have to manually click to install it) or select Automatic (Delayed Start) to wait until the update is available. If there is a complete update, then choose it. Then Windows 10 will allow you to postpone updates for 3 days, every 3 days you will choose to delay further.
On Windows 10 Pro and Education, some of you reported that method 1 couldn't be done, it still updated itself, I've tried combining method 1 with method 2 below, it's fine. If you have a similar situation, you should do both method 2.
2. Turn off Windows 10 updates with Group Policy Editor
1. Open Group Policy Editor, press Windows key + R to open the Run command window, then type gpedit.msc there and press Enter.
2. On the Group Policy Editor window, navigate to the key:
Computer Configuration > Administrative Templates > Windows Components > Windows Update
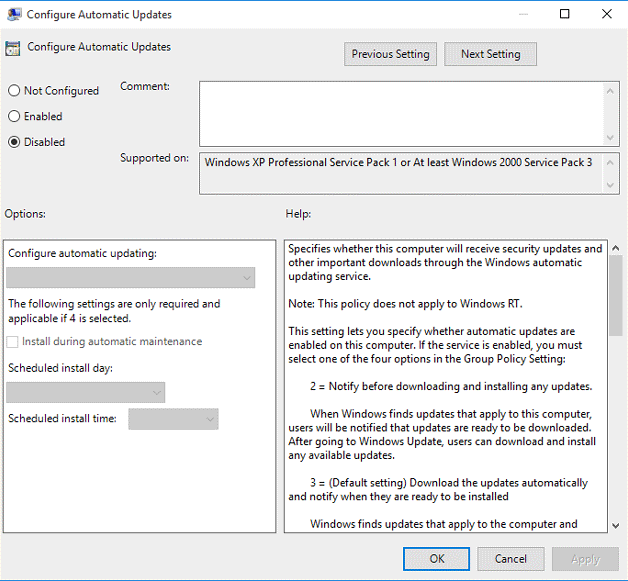
3. Find Configure Automatic Update, double-click it and select Disabled, then proceed to save the changes and you're done.


4. Block Windows 10 from updating for 365 days
In the Registry on Windows 10 1803, 1809, 1903, 1909 and 2004, there is an option that allows you to select the specific version of Windows you want to use. That is, you can modify the Registry and have your device use a specific version of Windows 10, as long as that version is still supported by Microsoft.
Additionally, the ‘TargetReleaseVersionInfo’ entry in the Registry also allows users to disable downloading of feature updates for up to 365 days. If you want to use a specific version of Windows 10
1. Press Windows + R, type regedit.
2. Navigate to
HKEY_LOCAL_MACHINE\SOFTWARE\Policies\Microsoft\Windows\WindowsUpdate
3. Right click on Windows Update.
4. Select New. Select DWORD (32-bit) Value and name it TargetReleaseVersion.
5. Set the value of TargetReleaseVersion to 1.
6. Right-click on the Windows Update folder again.
7. Select New and click String Value.
8. Name it TargetReleaseVersionInfo and enter the Windows 10 version(1890, 2004, 20H2...) number as the value.

You can also enable this feature using PowerShell. To defer updates using PowerShell, run the command with the following syntax:
reg add HKLM\SOFTWARE\Policies\Microsoft\Windows\WindowsUpdate /f /v TargetReleaseVersionInfo /t REG_SZ /d XXXX
In the command syntax above, you need to replace “XXXX” with the version of Windows 10 you want to continue using.

This feature will be very useful when a new update is forced to install on your device, or you have to delay the update to upgrade your device. For example, if you are on version 1903 and do not want to upgrade to version 2004, you can enter the value “1903”, to stay on version 1903, or enter “1909”, to be updated to version 1909.
5. Block Windows 10 updates in regedit
1. You type regedit in the search box, press Enter to open the registry window.
2. Copy and paste the following link
HKEY_LOCAL_MACHINE\Software\Policies\Microsoft\Windows\WindowsUpdate\AU

3. Double-click NoAutoUpdate, in Value data, enter 1 and then click OK as shown:
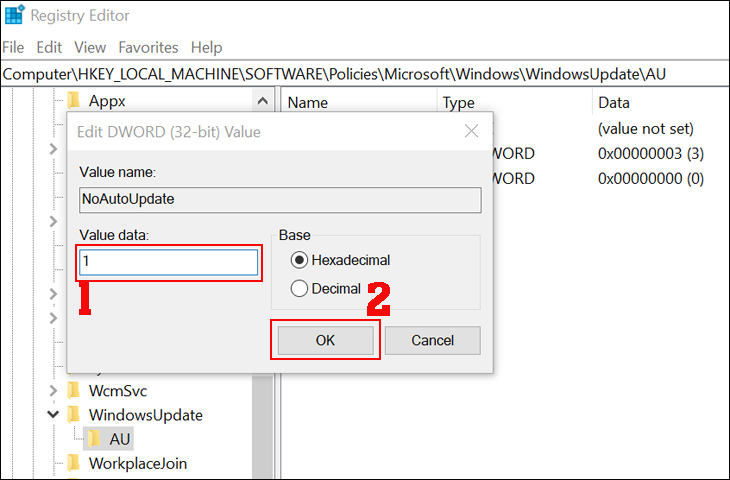
After completion the value of NoAutoUpdate will now be 0x00000001(1). If you want to let Windows 10 update automatically again, change the Value data value in the step above to 0.
6. Pause Windows Update on Windows 10 via Settings
This way of turning off Windows 10 updates is only temporary, allowing you to postpone the update to a more suitable time rather than turning off the update completely. The maximum delay time is about 30 days each time.
1. You enter Windows Update settings in the search bar.
2. The Windows Update interface opens, find Advanced options:

3. Find Pause updates > Pause until > you choose the date you want to update Windows 10.

Then return to the Windows Update interface, you will see a message that the update has been postponed to the date you selected as successful:


9. How to block Windows 10 from updating to Windows 11
Now, when Windows 11 is released and exists in parallel with Windows 10, in addition to the need to turn off Windows 10 updates, many users also want to block Windows 10 from updating to Windows 11. How to block Windows 10 from updating to Windows 11 is also not available. Anything complicated, you can do it easily by following these steps:
A. Use Regedit Editor
1. Press Windows + R to open Run then type regedit and press Enter.
2. In Registry Editor, find the following key:
Computer\HKEY_LOCAL_MACHINE\SOFTWARE\Microsoft\WindowsUpdate
3. Right click in the space on the right hand side then select New > DWORD (32-bit) Value and name this value TargetReleaseVersion and assign it the value 1.
4. Right-click in the space on the right hand side then select New > String Value and name this value TargetReleaseVersionInfo and assign it the value 21H1.
5. Restart the machine for the changes to take effect. If you need to update to Windows 11 you just need to delete the two TargetReleaseVersion and TargetReleaseVersionInfo values.

B. Use Group Policy
If you use Windows 10 Pro, you can also use Group Policy to block updates to Windows 11.
1. Open Group Policy Editor, press Windows key + R to open the Run command window, then type gpedit.msc there and press Enter.
2. Go to Local computer policy > Computer configuration > Administrative models > Windows components > Windows update > Windows Update for Business.
3. Next, double-click Select the target feature upgrade version select 21H1 and click OK then restart the machine.

4. To continue updating to Windows 11, simply repeat the steps above but choose 21H2 instead of 21H1.


No comments:
Post a Comment