Have you tried to delete a file, folder, or icon from your computer but were unable to do so and instead received an error message that said “This item could not be found in Windows 10”? This is a common error that rarely occurs in Windows 10 computers and prevents users from deleting a specific file or folder. The cause of this error is not known, but it may be that the file intended to be deleted has become corrupted or is in use by another program. There are several steps that can help you to resolve this error and successfully delete the file you want to delete.

A. End The Windows Explorer Process
Before jumping to the actual solution in this guide, you should try some simple fixes. Usually, file problems that cannot be deleted can be fixed on the next reboot or update. Go to Check for updates in system settings and a reboot should fix any unresolved issues.
Sometimes the problem is caused by Windows Explorer - the main application that accesses all file systems. Press Ctrl+Alt+Del to navigate to the Windows Explorer process and end the task. Reboot again to see if the problem persists.
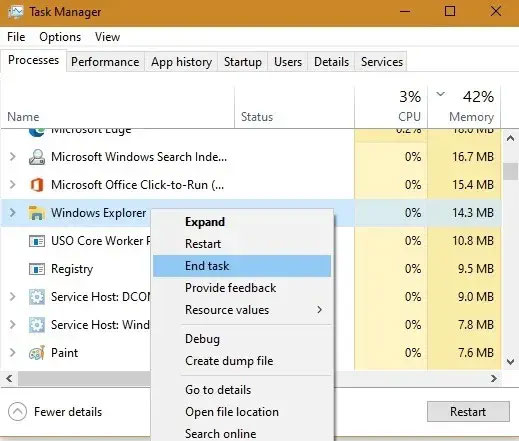
1. Press CTRL + ALT + DEL on your keyboard and select Task Manager from the options displayed on the screen. Open Task Manager
2. The Windows Explorer process will be down below under Windows Process. Make a right-click on it and then click the End Task option from the contextual menu.
4. There is no need to fret as all you have to do is click on the File tab in the Task Manager Window (which did not disappear by the way) and click on New.
5. Now type explorer.exe on the text box and click on OK.

6. Everything will be restored to normal.
Now try to delete the file or folder, and you should not face the could not find this item in Windows 10.
B. Use Command Prompt To Fix “Could Not Find This Item”
If you are having trouble using File Explorer to delete files, there is an option that is to use the Command Prompt. Using Windows Command Prompt to remove errors is the simplest solution. Make sure your Windows 10 system is up to date to avoid any errors with the Command Prompt. You can easily open Command Prompt with admin rights.
CMD has several commands to work with your file system, and one of these commands allows you to delete files from your memory. You can use these commands to retrieve the folder contents and then remove the file you selected from the list.
1. Search for Command Prompt using Cortana search and click on Run as administrator to open it in admin mode.

2. In your Command Prompt window, go to the directory where the file you want to delete is located. Use the CD command followed by the directory path to get to your directory.
3. Once you’re in your selected directory, run the following command to view a list of all files in it. dir

4. You should see the name of the problematic file in the list.
5. Type the following command, press Space, type the name of the file you want to delete, and hit Enter. So to delete a file named myfile.txt, you would enter: del myfile.txt

6. If you’re deleting a file that has spaces in its name, enclose the file name with double quotes.

7. The file will be deleted without a prompt.
Rename The File Using Command Prompt Before Deleting It
Sometimes the reason you get the “could not find this item” error is because your file name is too long to be handled by your system. In that case, you can first shorten the name to delete the file.
1. Launch a Command Prompt window with admin privileges on your PC.
2. Use the CD command to get to the directory where your file is located.
3. Note down the full name of your file as you’ll be using it in a command.
4. Type the following command into the Command Prompt and press Enter.
ren oldname.ext newname.ext
- ren – the short form for rename
- oldname.ext – replace this with the current name of your file
- newname.ext – replace this with the new name for your file

5. Once the file is renamed, use File Explorer to access and delete it. It should delete without any issues this time around.
Delete Files That Have No Extension
Some problematic files have no extensions and this makes it really difficult to delete them from a Command Prompt window. Luckily, there’s a command you can use to delete all the files inside of a folder without knowing their extensions.
1. Open a Command Prompt window on your computer.
2. Navigate to the folder where your file is located using the CD command.
3. Type in the following command and press Enter. del *.*

4. All files inside the folder will be removed.
Delete The Folder Containing The File
If you still can’t delete the file and it keeps throwing the “could not find this item” error, you can try deleting the folder instead. It removes the folder as well as all files in it, including the problematic file.
1. Open a Command Prompt window on your PC.
2. Type in the following command, press Space, enter the full path to the folder you want to delete, enclose it with double-quotes, and hit Enter.
rmdir /s

3. You’ll get a prompt asking if you really want to delete the folder. Type y and press Enter to confirm your action.

4. You can use the /q parameter with the above command to skip the deletion prompt. It removes the file without asking if you really want to do it.
C. Create archive files and delete files
If you have used WinRAR to create archives on your computer before, you may know it allows you to delete your files after the archive is created. You can use the same option to delete files that keep getting Could Not Find This Item error.
The idea here is to create a new archive using the problematic file and let WinRAR delete your file after creating the archive.
1. Download and install the WinRAR application on your computer.
2. Right click on the file you want to delete and select Add to archive. It allows you to create a new archive using selected files.

3. The following screen allows you to configure how your archive is created. You will find an option that says Delete files after archiving there. Check the box, customize the other options as you like, and click OK at the bottom.

4. The new archive containing your files, including your problematic files, will be deleted. You can also now delete the archive by right-clicking on it and choosing Delete.

This is a fresh idea and will work in most cases.
D. Deleting Files In Safe Mode
The final method to resolve the could not find this item in Windows 10 is to reboot your computer in Safe Mode and then delete those files.
1. Press Windows Keys + R from your keyboard and wait for the Run Box to open.Type msconfig in the text box and click on OK.
2. Click on the Boot tab in the MSConfig Window and check the box next to Safe Mode.

3. Click on Apply and then OK.
4. Restart your computer, and it will reboot in Safe Mode.
5. Delete the problematic file and follow the above steps to remove the checkmark in the box next to the Safe Mode.
6. Restart the computer, and it will reboot in normal mode, and the file will also be deleted.
This way, you will get rid of the file causing issues related to Could not find this item in Windows 10.
E. Use DelinvFile To Get Around The “Could Not Find This Item” Error
The problem of deleting files has existed for a long time on Windows computers and there are several applications to help you solve them. One of them is DelinvFile. It allows you to delete files that you cannot delete yourself. You can use this tool to remove problematic files from your PC.
1. Install the DelinvFile application on your PC.
2. Launch the application and navigate to the folder containing the file. Click on the file to select it.
3. Click the Delete File or Folder button to start deleting the file.

4. You will see a prompt asking to confirm your action. Click Yes to continue deleting the file

This should help fix the issue.


No comments:
Post a Comment