Don't like the bottom position of the taskbar? This is a simple trick to move the taskbar to the top of the screen in Windows 11 operating system.
Windows 11's taskbar has changed a lot compared to Windows 10. Start menu is mostly centered, updated icons, system icons and notification buttons and nice redesigned icons and icons. but simple and more. All in all, the new taskbar is a much-needed improvement.
That being said, with all the improvements, there are also some bad downgrades. These include but are not limited to getting rid of right-click options, not being able to drag and drop files and apps, not being able to move the taskbar's position from the bottom, and more.
If you remember, you can move the taskbar from bottom to top, left or right. Although not many people use the option to move the taskbar position, it is still quite useful. Especially for the proficient users who like to customize the look and feel of the operating system. For example, I have seen many people move the taskbar to the top of the screen just because they don't like the bottom position.

Although Microsoft has removed this option, you can still move the taskbar position to the top of the screen using the registry trick. All you have to do is modify a single value and you're good to go.
So this simple Windows 11 tutorial will show you how to move the taskbar to the top of the screen without any further manipulation.
Move Taskbar To The Top Of The Screen
1. Type regedit into the Windows 11 search. From the results, select the Regedit application 2. Then use the left pane to navigate to this key,
Computer\HKEY_CURRENT_USER\Software\Microsoft\Windows\CurrentVersion\Explorer\StuckRects

3. Click on one in the StuckRects3 folder and look in the right window pane, double-click the Settings key to display the binary content

4. We will be making a very careful edit to this binary to move the taskbar to the top of the screen.
When the Edit Binary Values screen opens, locate the second row of data, the first value should be 00000008. From there find the value in the fifth column which should be 03. Place the mouse pointer over or now right side of 03 and double click. That action will highlight the number 03
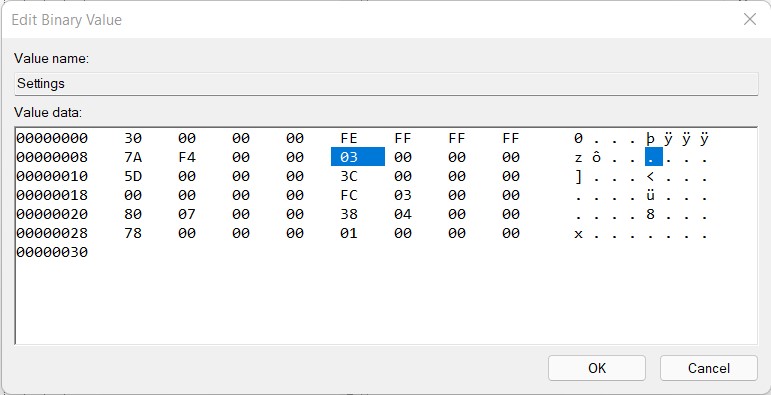

6. With the value changed to 01, click the OK button and then close the Registry Editor.
7. To apply the change, you must restart the Windows Explorer process. Restarting the PC may not be enough to complete the process.
8. Press the keyboard combination Ctrl + Shift + Esc to open the Task Manager. On the Processes tab, find Windows Explorer in the Apps section,

9. Right-click the Windows Explorer entry in the list and select Restart from the context menu. the Windows 11 taskbar is now displayed at the top of the screen.

To change the taskbar back to its normal position at the bottom of the screen, edit the same key in the Windows 11 Registry File and replace 01 with the default 03 and restart Windows Explorer as before.
Video:
Note: Some readers are curious if it is possible to display the taskbar on the side of the screen; obviously, this is preferred for many widescreen users. Replacing the default 03 in the binary panel with 02 will place the taskbar on the left side, replacing 03 with 04 will place the taskbar on the right side of the screen.


No comments:
Post a Comment