Recently upgraded to Windows 11, but you’re suddenly seeing slow internet speeds?
There are a couple of factors that might cause this. It could be your provider or the connection itself, or it could be closer to home, with incorrect settings on your PC.
If you’re seeing sluggish speeds on your PC, you’ll need to investigate. Here are several possible fixes you can try to fix slow internet on Windows 11.
We are connected to the Internet for the most part of the day, be it for work, shopping, or recreational purposes. But, several users after upgrading to Windows 11 have reported slow Internet.
A slow speed affects the whole user experience, be it for browsing or downloading files from the web. With the increase in the size of web pages and dependence on downloads, it’s imperative that you look for ways to resolve the problem.
1. Restart Your Router or Internet Connection
Before you try anything else, try restarting your modem or router to make sure you have a good, stable connection. If you call your ISP's support, they will ask you to do that.
There are also some things to check on your PC to fix slow internet connection. Here are the different troubleshooting steps you can use to make things work more smoothly.
2. Restart Your Computer
If you're getting a connection, but it suddenly stops or slows down, try restarting Windows 11. There could be unnecessary processes or services running in the background. Restarting your device can clear them out and provide a fresh start.
To restart your PC, right-click the Start button and select Shut down or sign out > Restart.
3. Run the Internet Connection Troubleshooter
Windows 11 has various troubleshooters that can identify and fix problems on your PC. This can help you fix internet problems, including slow internet speeds.
1. Click Start > Settings
2. Select System on the left. On the right, click the Troubleshoot option.

3. Under the Options section, click on Other troubleshooters

4. On the following screen, click the Run button next to Internet Connection.

Work your way through the troubleshooting wizard by following the onscreen instructions. Internet Connection Troubleshooter
Video:
- OpenDNS: 208.67.222.222 and 208.67.220.220
- Cloudflare DNS: 1.1.1.1 and 1.0.0.1
- Google Public DNS: 8.8.8.8 and 8.8.4.4


1. Press Ctrl + Shift + Esc to launch the Task Manager.
2. Navigate to the Performance tab.

3. Click on Open Resource Monitor at the bottom.
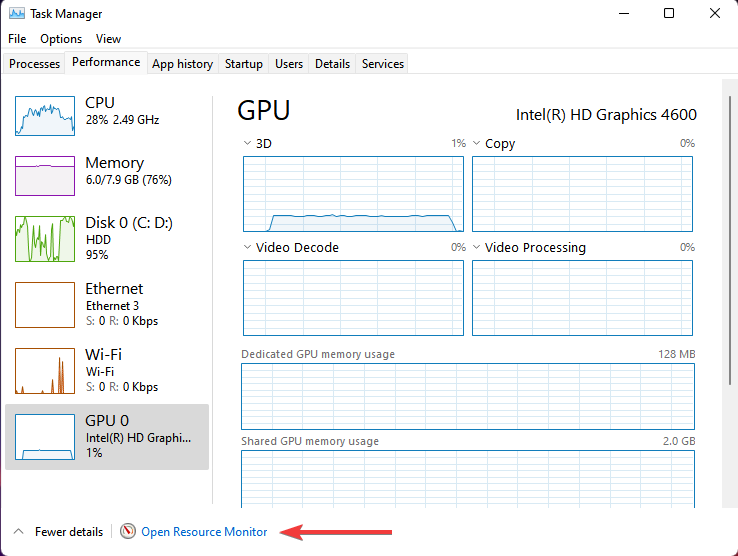
4. Go to the Network tab in the Resource Monitor window.

5. Locate the programs that are consuming way too much data, right-click on them, and select End process.

Certain processes that consume a considerable amount of data can be terminated to increase the Internet speed in Windows 11. However, do remember to not end any critical tasks, such as Windows Update.
6. Disable apps from running in the background
1. Press Windows Keys + I to launch the Settings app.
2. Select Apps from the list of tabs in the navigation pane on the left.

3. Click on Installed apps on the right.

4. Locate the app that you don’t want running in the background, click on the ellipsis next to it and select Advanced options from the menu that appears.

5. Next, click on the Let this app run in the background dropdown menu.

6. Select Never from the list of options.

Disabling background apps in Windows 10 is vastly different from the process in Windows 11. In the former case you can easily disable them all at once while for the latter the settings are specific to each application.
When some apps run in the background and use data, it can lead to slow Internet issues in Windows 11. Also, some of these apps can download files or updates.
It's best to disable unimportant apps running in the background to speed up downloads. Whenever you need to work on any of these, just launch them.
7. Turn off metered connections
1. Press Windows + I to launch the Settings.
2. Select Network & internet from the list of tabs in the navigation pane on the left.

3. Click on Wi-Fi or Ethernet depending on the network type

4. Click on the network that you are connected to.

5. Disable the toggle for Metered connection

Contact your ISP
If the problem persists, contact your ISP. Again, you can only download the fastest data when your ISP allows you. Sometimes your ISP may throttle your bandwidth, which will make your connection even slower.
To improve your Internet speed on Windows 11, first run the Internet troubleshooter. Then update or reinstall your network driver. Make sure to reset your network settings and disable your VPN. Alternatively, adjust your bandwidth settings and contact your ISP.


No comments:
Post a Comment