While trying to update Windows, Microsoft prompts that the current driver on your PC may be better than the one we are trying to install, We will continue to try to install it.
However, you need to keep Windows up to date by all means. So what can you do right now?
I will define the question for you. That's why I'm going to compile some fixes that you can apply to update Windows out of this situation. You will also get acknowledgment of the reasons behind this happening. Let's explore.
Why Does the Message Appear?
This is a Windows Update related problem. There are a few reasons behind it. It may be interrupted when downloading or installing updates. Corrupt system files can also be an issue. Rarely, but the Windows Update component can be damaged. Another reason could be outdated Intel Graphics driver.
What to Do While ‘A Current Driver On Your PC May Be Better’
Regardless of the reason, this message appears very commonly while trying to update Windows manually. In this case, many users have left their PCs for automatic Windows updates. However, it's an issue that needs to be addressed for Windows to work better. So you need to update Windows anyway.
Fix 1: Run the Windows Update Troubleshooter
While facing the problem, the first thing you can try is to run the Windows Update Troubleshooter. In many cases, it solved the problem.
1. Press the Windows keys + I. Following that, you will get access to the Settings window. 2. 2. Then you have to find the Update & Security category and select it.
3. Then you need to select the Troubleshoot section from the menu on the left.
4. Next, take a look at the right side. From here you have to find the Additional troubleshooters option. While looking for an option, click it.
5. As a result, a list of troubleshooters will appear on the screen. Here, you have to select Windows Update. Following that, you will get a Run the troubleshooter option right below. You have to click on it.
Thus, the troubleshooting process will begin. It may take a few seconds to finish the diagnosis. At the end of the activity, you'll receive possible suggestions for fixing the discovery. You can apply them manually or automatically.
Finally, restart the computer after applying the suggestions and try to update windows. If the message appears again, you will need to perform further fixes.
Video:
- net stop bits
- net stop wuauserv
- net stop appidsvc
- net stop cryptsvc
- rmdir %systemroot%\SoftwareDistribution /S /Q
- rmdir %systemroot%\system32\catroot2 /S /Q
- netsh winsock reset
- netsh winsock reset proxy
6. Restart the BITS, Windows Update, and Cryptographic services using the following commands and make sure to press Enter on each line:
- net start bits
- net start wuauserv
- net start appidsvc
- net start cryptsvc
7. Restart your Windows PC.
Fix 4: Restart Windows Update Service
You can fix the problem from the Services settings. Here the process will be simple. You need to restart the Windows Update service.
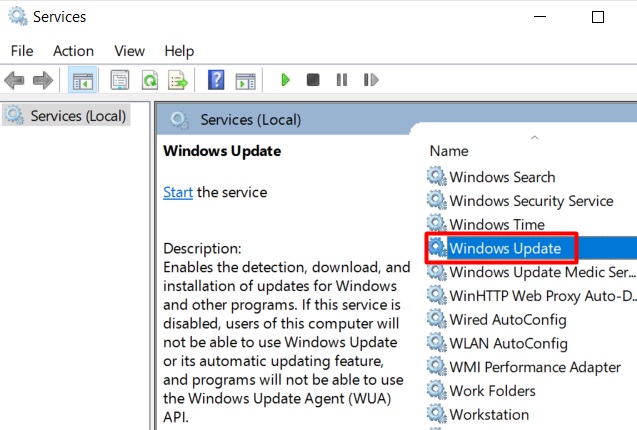
1. Press the Windows key and type services. Following that, you'll see the Services app preface at the top of the interface that appears. You have to click Run as administrator from below the application's preface.
2. As a result, a 'Services' window will appear on the screen. You have to find Windows Update from the list of services that appear. Then double click on it.
3. As a result, the Windows Update Properties window will appear. Here you need to select Automatic as the Startup type. Make sure the Start tab is selected. Then click Apply and Ok at the bottom.
4. Then, right click on the Windows Update service again. You have to click on the Restart option from the list of activities that appear. It will take a few seconds to complete the Windows Update Service restart process.
Fix 5: Run SFC and DISM . commands
Running the SFC (System File Checker) and DISM (Servicing and Deployment Image Management) commands are the most common but really helpful fixes. Here I will cover the process briefly.
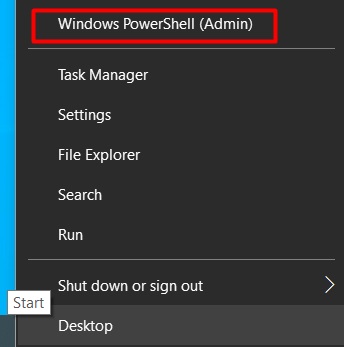
1. Right-click on the Start menu and select Windows PowerShell (Admin) from the list that appears.
2. As a result, a Windows PowerShell (Admin) window will appear on the screen after you confirm it. Then copy the command text below and paste it in the window.Then press the enter key. The scan will take a few minutes. Once done, you must close the Window.
Sfc /scannow
3. Again, you need to open Windows PowerShell (Admin). Then copy the below command with inverted commas and paste it in the window.
Dism / Online / Cleanup-Image / RestoreHealth
Then press the enter key. This process will take a few minutes to complete. Then you have to restart the PC. Finally, try updating Windows again.


No comments:
Post a Comment