Want to know how to enable or disable Compact View in File Explorer on Windows 11/10?
Microsoft has taken an amazing step forward in user experience and intuitive interface design in Windows 11. Everything from the taskbar to the Settings menu has a softer and more accessible design with a touch of touch. neater feel.
File Explorer has also been redesigned (finally) and now the main toolbar has only eight options by default. Some functions are still available as buttons in File Explorer, but everything else is accessible through menus.

However, if you prefer a more traditional experience and want multiple files and folders to be displayed at once, you can enable Compact View in File Explorer.
In this guide, you will learn how to enable or disable Compact View in File Explorer on Windows 11/10 in detail.
A. Use File Explorer.
One of the easiest ways to enable or disable Compact View is to make some changes directly in the File Explorer.
The Compact View option is already included in File Explorer, which means you can simply click on it to make the desired changes.
1. Launch File Explorer by clicking the File Explorer icon on your taskbar. Alternatively, you can also press the Windows Keys + R on the keyboard at the same time to open it.
2. Inside the File Explorer window, click View and then Compact View from the list of available options.

Following the steps mentioned above will enable or disable Compact View in File Explorer on Windows 11 without any problems.
B. Modify folder options.
Another way to make the desired changes on your Windows 11 is to make the changes in the Folder Options screen.
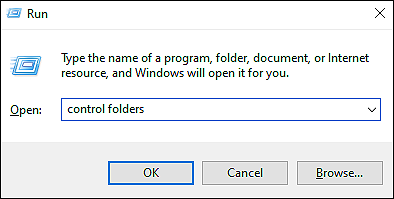
Normally, Folder Options is found in the Appearance and Personalization section of the Control Panel, but you can also access it through the Run dialog box.
1. Press the Windows Keys + R on your keyboard simultaneously to open the Run dialog box. Type the control folder and press Enter. This will launch the Folder Options screen on your computer.
2. Now navigate to the View tab and checkmark the box associated with Decrease space between items (compact view) to enable Compact view. To disable it, uncheck the box.

3. Finally, click Apply to save the changes and close the Folder Options screen.
Hopefully, this will make the necessary changes immediately.
Video:


No comments:
Post a Comment