Some users are complaining about problems with the default resolution on their Windows 11 machines. According to these users, they cannot change the default screen resolution from Settings. If the on-screen resolution is set to anything less than the default (recommended) resolution, you may be able to troubleshoot following this easy issue on your computer.
A. Update display card adapter driver
You must update the display card adapter on your computer.
1. At first, press Windows key + I key together. Then open Settings
2. Click System. Then, on the right side, click Display
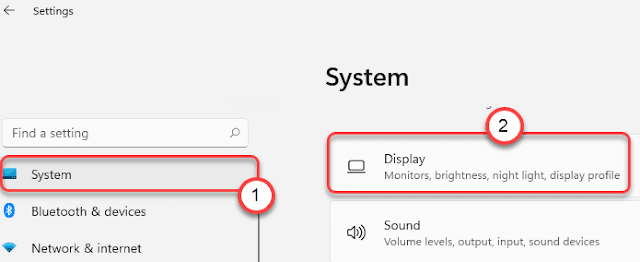
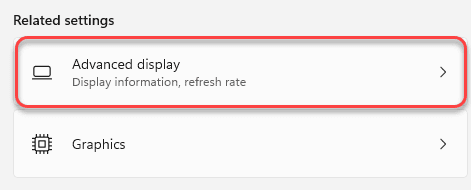
3. Now, on the same pane, click on the Advanced display setting.
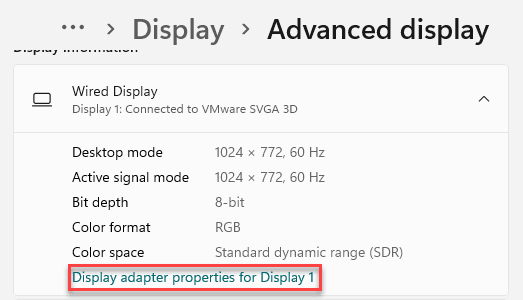
5. Then click Display adapter properties for Display 1
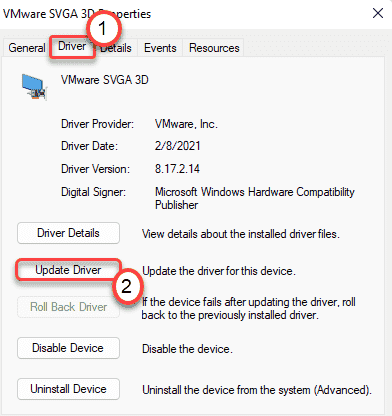
6. Click Adapter tab. Then click Properties in the Adapter tab.

7. Click Driver tab. Next, click Update driver to update the graphics driver.
8. Click Search automatically for drivers
Windows will search for the latest display driver on your computer and install it on your computer.

9. Now, Restart your computer.
10. After Restart your PC. Open the Settings
11. Then click System and click Display.
12 . Now, on the right hand side, scroll down to the Scale and Layout section.
13. Then, click Display resolution. Now you can set it to any resolution of your choice.

B. Install the latest NVIDIA/AMD graphics drivers
If updating the graphics driver from default settings fails, try updating directly.
We have covered the steps for NVIDIA drivers only. If you have an AMD gpu, the steps are different.
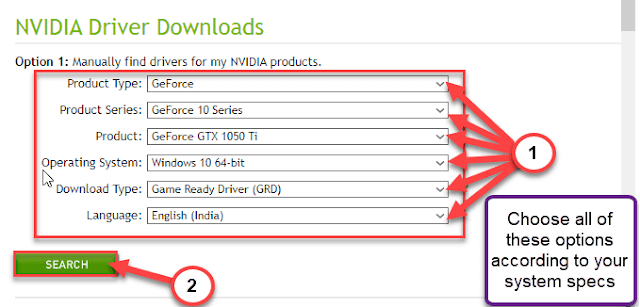
1. First, visit the NVIDIA driver website.
2. Put the driver specific specifications in the appropriate section (like your 'Product Type', 'Operating System', etc.).
3. Finally, you need to click Search.
4. To download the driver on your system, click Download.
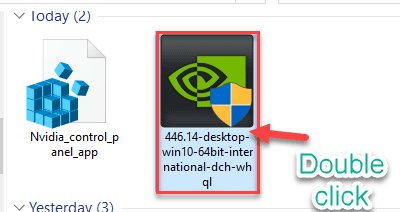
5. First, go to the driver download location. Then just double click the offline installer to launch it.
6. When the NVIDIA Graphics Drivers window appears, click NVIDIA Graphics Driver and GeForce Experience.
7. You must agree to the terms and conditions. Click Agree and continue.
8. Then select the Customize (Advanced) option to try it out. Then, click Next.

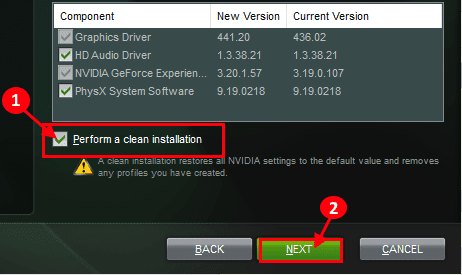
9. Don't forget to check the box next to Perform a clean installation. To start the installation, click Next.
Once the installation is done, click Close to close the NVIDIA Graphics Driver Installer window.
This will fix the problem for sure.


No comments:
Post a Comment