Modern CPUs have hardware virtualization features that accelerate virtual machines created in VirtualBox, VMware, Hyper-V, and other applications. But these features are not always enabled by default.
Virtual machines are a great initiative. With virtualized applications, you can run a virtual machine entirely on windows in the current system. With that virtual desktop, you can run different operating systems, test applications in a sandbox environment, and test features without any worries. To work, virtual machine applications need hardware acceleration built into modern CPUs. This means Intel VT-x hardware acceleration for Intel CPUs and AMD-V hardware acceleration for AMD CPUs.

Occasionally, you may experience an error message in VM applications like the following:
- VT-x / AMD-V hardware acceleration is not available on your system
- This server supports Intel VT-x, but does not enable Intel VT-x
- The processor on this computer is not compatible with Hyper-V
There are many different causes for these errors. The first is that hardware acceleration is not enabled. On systems with Intel CPUs, the Intel VT-x feature can be disabled through BIOS settings or UEFI firmware. In fact, it often defaults to off on new computers. On systems with AMD CPUs, no such error will occur because the AMD-V feature is always enabled, so the BIOS or UEFI settings are not changed.
Another reason is to use a virtualization application such as VMWare or VirtualBox when the machine has Microsoft's Hyper-V installed. Hyper-V takes care of hardware acceleration features and is not accessible to other virtual applications.
So let's see how to fix these problems.
Uninstall Hyper-DRAW
If you have Hyper-V installed, it becomes "greedy" and does not allow other virtualization applications to access hardware acceleration features. This usually happens with Intel VT-x hardware, but can happen with AMD-V as well. In this case, you will see an error message that Intel VT-x (or AMD-V) could not be found even though it is enabled on your computer.
To resolve this issue, simply uninstall Hyper-V. Hyper-V is an optional Windows feature, so it's a bit different from a regular app uninstall.
1. Go to Control Panel > Uninstall a Program. In the Programs and Features, select Turn Windows features on or off..

2. In the Windows Features , clear the Hyper-V checkbox and then click OK

3. When the Hyper-V uninstall is complete, restart the computer and then try using VirtualBox or VMware again.
Enable Intel VT-x in BIOS or UEFI
If you have an Intel CPU and uninstalling Hyper-V doesn't solve the problem - or the virtual application still sends a message that Intel VT-x has been disabled - you need to go into the BIOS or UEFI settings. on the computer. The BIOS system is commonly found in personal computers manufactured prior to the release of Windows 8 and may be superseded by UEFI in today's computers. The ability to use UEFI is increasingly adding to the modernity of personal computers.
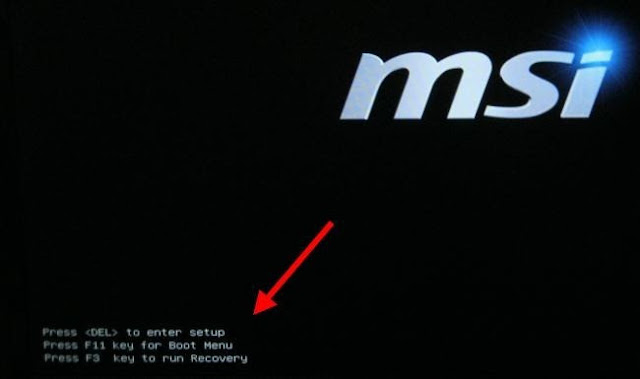
On a BIOS-based system, access the BIOS setup by restarting the PC and pressing the appropriate key as soon as it first boots. The key you need to press depends on the computer manufacturer, but is usually the "Delete" or "F2" key. You may also see a message during startup that says "Press {Key} to access setup." If you can't find the correct key to access the BIOS settings, just search the web for something like " {Computer} {model_number} access BIOS".
On a UEFI-based computer, you can’t necessarily just press a key while the computer is booting. Instead, you’ll need to follow these instructions to access the UEFI firmware settings from the Windows advanced startup options. Hold down the Shift key as you click Restart in Windows to reboot straight to that menu.

Whether your computer uses BIOS or UEFI, once you are in the settings menu you can start looking for options labeled Intel VT-x, Intel Virtualization Technology, Virtualization Extensions, Vanderpool or similar.
Usually you'll find the option in the Processor submenu. This submenu can be located somewhere under the Chipset, Northbridge, Advanced Chipset Control or Advanced CPU Configuration menus.
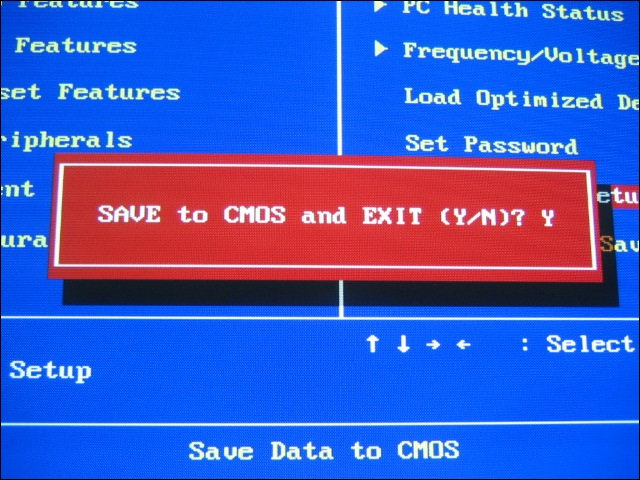
Enable the option and then select Save and Exit or a similar feature to save the setting changes and restart the computer.
After restarting the computer, try using VirtualBox or VMware again.
What to Do If You Don’t See the Intel VT-x Option in BIOS or UEFI
Unfortunately, some laptop manufacturers and motherboard manufacturers don’t include an option in their BIOS or UEFI settings for enabling Intel VT-x. If you don’t see the option, try performing a web search for the model number of your laptop—or your motherboard, if it’s a desktop PC—and “enable Intel VT-x”.
In some cases, manufacturers may later release a BIOS or UEFI firmware update that includes this option. Updating your BIOS or UEFI firmware might help—if you’re lucky.


No comments:
Post a Comment