Every time you unlock Windows 10 computer, you must press CTRL + ALT + DEL before signing. Some Windows 10 users don't like lock screen and they want to turn off lock screen. Unfortunately, Windows 10 doesn't have a built-in option to disable the Windows 10 lock screen, but you can disable the lock screen using Registry or Group Policy.
There may be other ways to disable the lock screen on Windows 10. However, I will demonstrate the steps that work with all versions of Windows 10.
A. To enable or disable secure login in netplwiz
1. Press the Windows Keys + R to open Run, type netplwiz into Run and click OK.
2 Click the Advanced tab and check (enable) or uncheck (disable) Require users to press Ctrl+Alt+Delete box under Secure sign-in for what you want to set, and click OK.
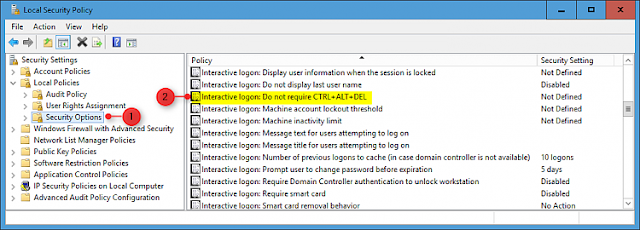
B. To Enable or Disable Secure Sign-in in Local Security Policy1. Open the Local Security Policy editor.
2. In the left pane, expand Local Policies and click / tap on Security Options to open it.
3. In the right pane of Security Options, double-click Interactive Logon: Do not required CTRL+ALT+DEL to open its properties.
4. Select Enabled or Disabled for what you want to set and click OK.
5. You can now close the Local Security Policy if you want.
Video:
C. To Enable or Disable Windows 10 lock screen using Group Policy
1. Click Start and run the command gpedit.msc. This launches the local group policy editor.
2. Navigate to Computer Configuration > Administrative Templates > Control Panel > Personalization
3. Here we will enable a policy called Do not show lock screen. By default, this policy is not configured. This policy setting controls whether the lock screen is visible to the user. If you enable this policy setting, users who are not required to press CTRL + ALT + DEL before logging in will see their selected cell after locking their PC.
4. Right-click on the Do not display the lock screen policy setting and click Edit. Click Enabled to enable this policy setting. Click Apply and OK.
The Do not show lock screen policy is enabled. Restart your Windows 10 computer and you should not see the lock screen appear. You can log in directly to your Windows 10 computer.
D. To Enable or Disable Disable Windows 10 lock screen using Registry
1. On your Windows 10 computer, click on Start and run the command regedit. Browse through the following registration path
HKEY_LOCAL_MACHINE\SOFTWARE\Policies\Microsoft\Windows
2. Right-click the Windows key (folder), select the New submenu and choose the Key option.
3. Name the key Personalization and press Enter.
4. Right-click the Personalization folder, choose the New submenu and choose the DWORD (32-bit) value option.
5. Enter the name as NoLockScreen and set the value to 1. After you make these changes, close the registry editor. Restart your Windows 10 computer. When you start Windows 10, you should see the lock screen no longer appear, you can immediately log into your Windows 10 computer.


No comments:
Post a Comment