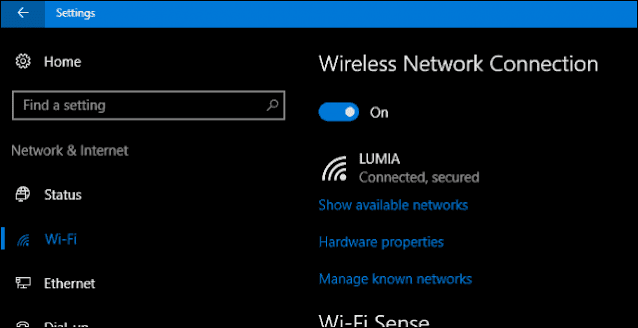
By default, every time you connect to a certain WiFi, your Windows 10 computer will automatically save and will automatically connect the next time. However, suppose if the WiFi network you connect to is too slow, you can delete that WiFi and connect to another WiFi.
Forget WiFi in Win 10 using the menu from the system tray
If the WiFi you want to delete is still displayed as a connectable network, that is, it is located near the device in use then you can completely forget them easily with the solution using the Taskbar.
1. Click on the WiFi icon in the lower right corner of the Taskbar to open a list of networks you can connect to in the area around you.
2. From the list above, locate the WiFi you want to remove and right click on. In the menu that appears, click Forget this network.
That WiFi will be immediately removed from your Windows 10.
Forget wifi on Windows 10 via Windows Settings
1. Open Windows Settings by clicking Start menu and then clicking on the icon.
2. In the Windows Settings, continue to click on Network & Internet to set the changes.
3. Under Network & Internet, click on Wi-Fi from the left window, then click Manage know networks link.
4. This option contains a list of WiFi that you have connected. From here, specify the WiFi you want to delete and click, select Forget this network.
The next time you connect, you will be prompted to enter your password and Windows will reset from scratch.
Delete Wifi with Command Prompt
1. Open Command Prompt, run as admin with Run as administrator.
2. At this point, an Administrator: Command Prompt window appears on the screen. Enter the following command in the Administrator window: Command Prompt to display a list of saved Wi-Fi connections:
netsh wlan show profiles
3. Next, find the network name you want to forget. Enter the following command into the Command Prompt window:
netsh wlan delete profile name = "PROFILE NAME"
Note: Replace PROFILE NAME with the name of the Wifi network you want to forget.
5. Finally, reboot to save the changes.
Note: In some cases, you may want to delete all wireless networks that have ever connected to your device
Enter the following command in the Command Prompt window and press Enter:
netsh wlan delete profile name = * i = *
With this action, Windows 10 will automatically delete all saved WiFi profiles. If you are connecting to a wireless network, your device will immediately disconnect, and want to continue accessing the internet, then password and Windows will reset.
IMPORTANT NOTE: Removing WiFi network doesn't mean Windows 10 will stop detecting it
It seems some people think that after deleting the WiFi saved on Windows 10, the network will no longer show up in the list of available WiFi networks you can connect to.
That's not right. Deleting a WiFi network just means Windows 10 stops storing its connection details and every time you stay in its coverage area, the computer no longer automatically tries to connect to this network. As long as the deleted network is in your area, then it will show up in the list of WiFi networks that Windows 10 can connect to.


No comments:
Post a Comment