Scheduling tasks in Windows is easy. Microsoft has included in Windows a very handy tool, called Task Scheduler, that allows you to add and automate tasks. If that doesn't go your way, you can also use third-party software, like Shutter, to get the job done. In this article, we will show you how you can schedule and automate tasks using both the built-in task scheduler and Shutter.
Use the Task Scheduler in Windows
To quickly open the task scheduler in Windows, go to Run -> taskchd.msc.
The Task Scheduler interface is divided into three compartments. The leftmost pane is a tree of the scheduled tasks. The middle pane will open the selected tasks in the tree. The rightmost pane is the task pane from which we can create new scheduled tasks.
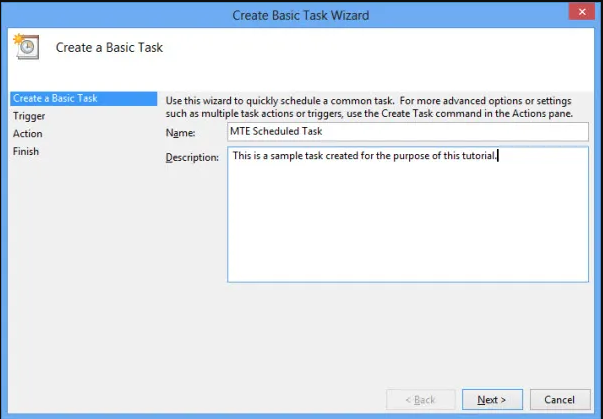
To create a new task, you just need to click on the button "Create Basic Task". This will launch a wizard that guides you through the command building process.
1. Fill in the name and description fields in the task wizard
2. Select a trigger to activate the task. This can be a specific event or a recursive timing event.
3. In the next screen, you will be asked to specify the task to perform when the trigger is activated. You can start programs, send email or display messages
4. If you selected Start a program, you will be prompted to select the application and add any arguments, if necessary.
For more advanced options, click the checkbox Open the properties dialog for this task when I click Finish and click Finish.
Here, you'll be able to add more triggers and actions, and more advanced settings.
Use Shutter to schedule tasks in Windows
For more reasons, Microsoft hasn't made the Task Scheduler an easier application to use. If you're looking for a simpler app with more configuration options, you can use Shutter, a portable and free Windows app to create scheduled tasks.
The shutter comes with a simple user interface. It has only one main screen. All configurations are done on the main screen. There are two fields, one for adding an event and one for adding action. You can choose whether to see all the events that need to be taken, or any of them will trigger actions. The conditions include ALL, AND, OR and 1 BY 1.
To add an event, click Click here to add event. This will bring up a new dialog where you can choose from different events.
Each event has its own options that will be displayed when the event is selected.
While Windows task scheduler only supports three types of events, Shutter has a wide variety of supported event types:
- Countdown
- On time
- Winamp Stops
- CPU Usage
- Network Usage
- User Inactive
- Battery Low
- Window
- Process
- Ping Stops
- File Size Limit
- Lid
You can add multiple events to trigger one or more actions.
To add an action, click “Click here to add an action”. The following actions are supported by Shutter:
- Shutdown
- Reboot
- Logoff
- Lock Workstation
- Sleep
- Hibernate
- Turn Off Monitor
- Screen Saver
- Volume
- Hang Up
- Alarm
- Message
- Play Sound
- Run Program
- Open File
- Close Window
- Kill Process
- Utilities
Each action has its own options.
The Start button will start the scheduled task and the Now button will tell you the current status of the task.
The advantage of Shutter is that you can save and import scheduled tasks to run them on multiple computers.
Conclusion
Windows Task Scheduler can be helpful for basic tasks, but somehow Microsoft doesn't make it particularly easy to use. Shutter is a great program that comes with lots of scheduling options for users. If you like simple and portable software, Shutter is the software for you.


No comments:
Post a Comment