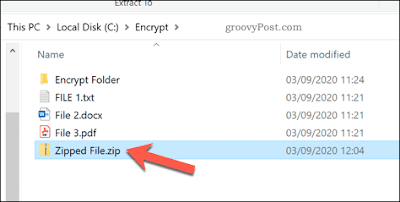
Zipping a file isn’t unique to Windows 10. A lot of computer systems allow you to archive documents, but depending on the program you have, it might work differently.
Using Windows File Explorer to Zip Files and Folders
A method for creating zip files has been included with Windows since Windows XP. It allows you to create archives containing files and folders, regardless of the file type, combining them in a single zip file. This feature can be used from your desktop or from within the Windows File Explorer.
This built-in method for creating and using zip files in Windows 10 is quite basic, however. There isn’t, for instance, any method to add passwords to your zip file, although it does allows you to open password-protected zip files.
Zip files created using Windows 10 don’t allow for strong encryption, either. Using this method wouldn’t be a good option if you want to create secure files, for instance.
1. Locate File Explorer on the Windows 10 taskbar (the folder icon).
2. Locate the file you want to compress.
3.
- Right-click on the file.
- Or select all files by holding down the mouse button and dragging the pointer across the screen. Your mouse will create a blue selection box. All files within this box are highlighted with a light blue color. If you want zip multiple files.
- Or Right-click on the folder. If you want zip multiple files in a single folder
5. Select Compressed (Zipped) Folder in the next menu.
6. Rename your new ZIP file, and press the Enter key.
7. To access the file, double-click it. This will allow you to view the contents of the zip file in Windows File Explorer.
You won’t notice much difference between a typical folder and an open zipped file in Windows File Explorer. Windows is designed to ensure that browsing a zip files looks much like any typical folder.
Unpack a ZIP file
Unpacking a ZIP file is just as important as knowing how to ZIP the file. In Windows 10, your actions follow a specific algorithm that scans your file, mitigates repetitive information, and establishes a brand new file that boasts a smaller size and a new extension. The following steps demonstrate how to accomplish this:
1. Locate File Explorer on the Windows 10 taskbar (the folder icon).
2. Locate the file you want to decompress.
3. Right-click on the file.
4. Select Extract All on the menu.
5. On the next pop-up screen, select where you want Windows 10 to unload the files by clicking the Browse button.
6.Once you choose a location, click the Select Folder button.
7. Finally, click the Extract button.
Video:
Using 7-Zip To Zip Files and Folders in Windows 10
As an alternative to the built-in Windows File Explorer method, you can use 7-Zip to create new zip files instead.
7-Zip allows you to create archive files in almost all available archival formats. It offers strong support for encryption, password protection, file compression, and more. It’s also free and open-source, so you don’t have to pay to use it.
To start using 7-Zip, download and install the 7-Zip software for Windows. Once installed, you can create a new zip file by selecting files and folders in Windows File Explorer or on your desktop, right-clicking the selected files, then pressing 7-Zip > Add to archive.
This will open the 7-Zip Add to Archive window, where you can customize your zipped file before it’s created. For instance, under Archive Format, you can select the standard ZIP file format, but you can also select TAR, WIM, and 7Z.
For the best support (allowing almost all devices to open it), select ZIP. Otherwise, select 7Z, as this offers the best options for compression, file encryption, and more.
If you select 7z, other users will need 7-Zip or another file client that supports these files to open it.
You can also use 7-Zip to create encrypted files.
To do this, provide a password under the Encryption section. Make sure that AES-256 is selected from the Encryption method drop-down menu.
If you want to reduce the file size, you can increase the compression of the archive file by selecting an option from the Compression level drop-down menu.
If you want no compression, select Store. For medium compression, select Normal. For maximum compression, select Ultra, but this will add additional time to the time taken to compress the file and open it afterward.
You’ll also need to give the file and name and select where you want to save it. Do this using the Archive box at the top.
Once you’re ready to create the file, press OK.
This will create the new archive file for you in the archive file format you selected.
If you use the 7Z format or another available format, opening the file will open the 7-Zip File Manager. If you use the ZIP format, you can open this in Windows File Explorer like any other zipped file. You can also open it using the 7-Zip File Manager.


No comments:
Post a Comment