Typically, you will need to unplug and reconnect your printer to fix the problem. Additionally, deleting old and unused devices will help you organize your connected device list in Windows 11 and 10.
You can remove any connected printers from Settings. If that doesn't work, you can use Command Prompt and other ways to delete the printer. The following article will guide you through many ways to delete printers on Windows computers.

1. How to remove printer from Windows through Settings
You can easily add or remove printers from the Settings app. Here's how:
1. Press Windows + I to open Settings.
2. Open the Bluetooth & devices tab on the left.

3. Scroll down and click Printers & scanners. This will list all the printers connected to your computer.
4. Click the printer device you want to delete.

5. Click the Remove button in the top right corner and click Yes to confirm the action.
If you get an error, stop the Print Spooler service in Services and try again!
2. Uninstall the printer software to delete the printer
If the deleted printer option still appears, you can remove the printer driver associated with the device to completely uninstall it. You can remove drivers using the Apps & features tab in Windows 10 and 11.
To delete the printer driver:
1. Press Windows + I to open Settings.
2. Click the Apps tab on the left. The application list may take a few seconds to display, so wait until all applications are listed.
3. In the App list, you can scroll through or search for printer drivers.
4. When you find the printer driver, click the three-dot menu.
5. Select Uninstall then click Uninstall again to confirm action.

6. Wait for the driver to uninstall, then find any drives or other software associated with the printer and remove them.
7. After uninstalling, restart your PC.
3. Delete the printer using Control Panel
You can use the classic Control Panel to manage your printer. Removing the printer from Control Panel will have an effect if the printer was not removed properly during the uninstallation process.
To delete a printer using Control Panel:
1. Press Windows Key + R to open Run.
2. Type control and click OK to open Control Panel. You can also search for apps using the Windows search bar.
3. In Control Panel, go to Hardware and Sound.

4. Next, click Devices and Printers.
5. In the Printers section, locate and select the printer device you want to delete.

6. Right-click the printer and select Remove Device.
7. Click Yes to confirm action.
4. Delete the printer using Print Server Properties
Sometimes, removing the printer device does not completely remove the driver and can cause your printer to stop working. In such a case, you can use the Print Server Properties dialog box to delete the installed printer driver.
1. Press Windows Keys + R to open Run.
2. Type control and click OK.
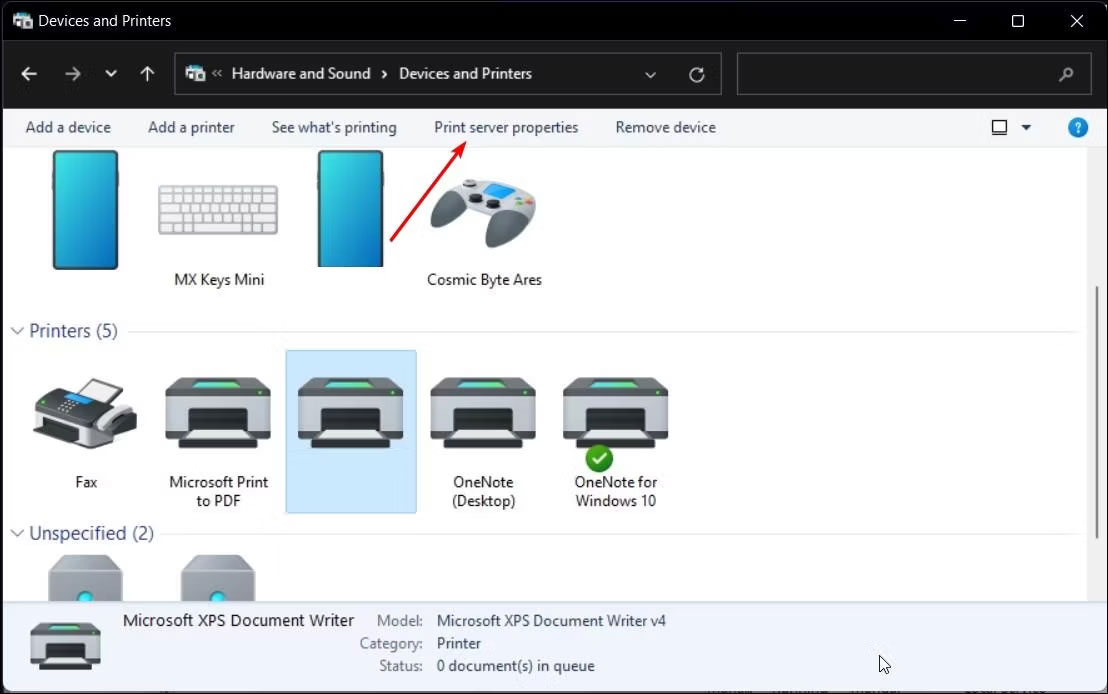
3. In the Control Panel window, go to Hardware and Sound > Devices and Printers.
4. Select any available printer and click Print server properties.
5. Open the Drivers tab in the Print Server Properties dialog box.
6. In Installed printer drivers, select the printer driver to uninstall and click Remove.

7. Next, select the Remove driver and driver package option.
8. Click OK to confirm the action and remove the driver.
9. Restart your PC to complete the driver removal process.
5. Uninstall the printer using Device Manager
Device Manager allows you to manage all internal and external devices connected to your system. You can use Device Manager to troubleshoot Windows systems, update drivers, add new devices, and remove connected devices.
To delete a printer using Device Manager:
1. Press Windows Key + X to open the WinX menu.
2. Click Device Manager from the context menu.
3. In Device Manager, click View and select Show hidden devices.

4. Next, expand the Printers section to see your printers.
5. Right-click the printer and select Uninstall device.

6. Select the Delete the driver software for this device option and click Uninstall.
7. If the Printers section is not available, expand the Print queues section and repeat the steps to delete the printer.
8. Close Device Manager and restart your computer to complete the uninstallation process.
6. How to uninstall a printer using Command Prompt
If you prefer Command Prompt to the traditional user interface, you can remove the printer from your PC using the dl command.
To uninstall the printer, use Command Prompt:
1. Click Win and type cmd into the Windows search bar.
2. Right-click on the Command Prompt option and select Run as administrator.
3. In the Command Prompt window, type the following command to see all the printers installed on your PC:
wmic printer get name
4. To delete the printer, type the following command:
printui.exe /dl /n "Your_Printer_Name"
5. In the command above, replace Your_Printer_Name with your printer name.
6. Press Enter to execute the command.
7. Remove the printer drive using Print Management
Print Management is a Windows utility that controls printers, drivers, ports, and servers. You can use this tool to remove printer drivers from your Windows computer. The Print Management utility is not available in the Home edition of the Windows operating system.
To delete the printer driver using Print Management:
1. Press Windows Key + R to open Run.
2. Type printmanagement.msc and click OK to open Print Management.

3. On the left, expand the Print Servers section.
4. Click your Local Printer server name to expand it.
5. Next, select Printers to view all installed printers.

6. On the right, select and right-click the printer you want to delete.
7. Select Delete and click Yes to confirm action.
8. Delete the printer driver using PowerShell
Additionally, you can remove the printer driver package using PowerShell as an alternative to Print Management. This is also a faster way to remove multiple printers in your Windows computer.
To remove the printer driver using PowerShell:
1. Press the Win key and type powershell.
2. Right-click Windows PowerShell and select Run as administrator.
3. In the PowerShell dialog box, type the following command and press Enter to view the list of printers installed on your computer:
Get-PrinterDriver | Format-List Name
4. Once you have installed the printer list, type the following command to remove the printer you want to remove:
Remove-PrinterDriver -Name "Printer-Name"
In the command above, replace Printer-Name with the printer name you want to delete.
Many ways to delete printers in Windows 10 and 11
You can easily remove a printer in Windows using the Settings panel. However, if the deleted printer still reappears, you can use the print server properties, Command Prompt, or remove the printer software to completely delete the printer.


No comments:
Post a Comment