Like Windows 10, Windows 11 is packed with accessibility features that make it easy to work on your computer. One such feature is the Magnifier tool, which allows you to magnify any part of the screen, even if the app you're using doesn't have a built-in magnifier.
You can use this feature to read documents with small fonts, edit images, or enlarge any part of the screen. Let's learn how to use the Magnifier tool on Windows 11 devices through the following article!

How to open the Magnifier tool on Windows 11
There are two ways you can launch the Magnifier tool on your Windows 11 device.
1. Press Win + plus sign to open the Magnifier tool. This will open a small dialog box showing you the various buttons you will need to use the tool.
2. You can also open this tool through the Settings app. Press the Win + Ctrl + M keys to open the Magnifier settings. Then, toggle the toggle under Turn on Magnifier.

Tip: If you have low vision, it is recommended that you automatically open Magnifier when you start your computer to reduce additional steps when it is needed. In Magnifier Settings, check the boxes next to Start magnifier before sign-in and Start magnifier after sign-in.

How to use Magnifier Reading option on Magnifier tool
The Magnifier tool not only makes it easy for the user to see everything on the screen, but also to read the text aloud. Follow the instructions below to use this option:
1. Open the Magnifier tool on your Windows 11 device.
2. Once opened, press the Play button to enable screen reader support. Alternatively, you can press and hold Ctrl + Alt + Enter to use the Magnifier Reading feature.

3. When this option is on, you'll see a blue box around the text or section the tool is reading. If you read the previous or next sentence, click the Previous or Next button. You can also press and hold the keys Ctrl + Alt + H to jump to the last sentence and Ctrl + Alt + K to move to the next sentence.

4. You can use the Tab key to navigate the screen and select the section you want Magnifier Reading to dictate. You will see a box around the sentence or word where the indicator is currently located.

5. Magnifier Reader option also allows you to choose where you want it to start reading. Click the pointer and speaker icon from the Magnifier dialog box. Alternatively, you can press and hold Ctrl + Alt, and then left-click the part you want the tool to read from.

How to customize Magnifier's Zoom Level and Zoom Increment through the Settings app
If you want to customize the screen zoom level of the Magnifier tool when enabled, you need to change the Zoom Level setting.
1. Open Magnifier settings by pressing Win + Ctrl + M.
2. In the Change zoom level section, use the plus and minus buttons to adjust the Magnifier tool's screen magnification when you open it.

To change how zoomed in or out of the screen when you press the + and - buttons, follow the steps below:
1. Press Win + Ctrl + M to open Magnifier settings.
2. Find the Change zoom increments option and select your preferred number from the drop-down menu.


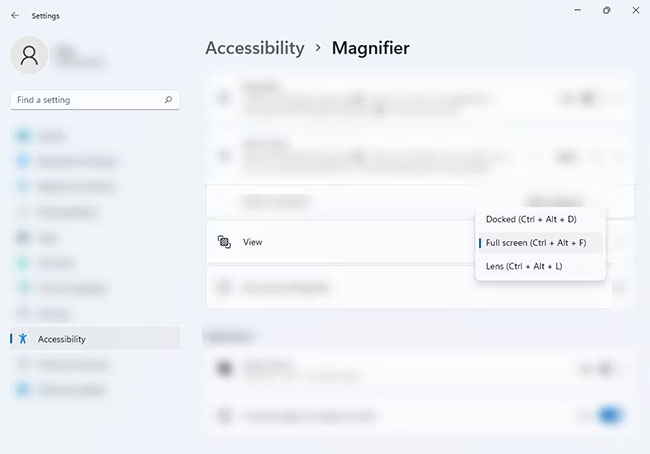
- Full screen view: Ctrl + Alt + F
- Docked view: Ctrl + Alt + EASY
- Lens view: Ctrl + Alt + ERROR
- Switch between views: Ctrl + Alt + CODE


How to invert colors with Magnifier tool?
If you sit in front of a computer screen for a long time, inverting the colors can help reduce eye strain, making text easier to read. It basically turns all black to white and white to black. Here's how you enable this option:
1. Open Magnifier settings by pressing Win + Ctrl + M.
2. Find the Invert colors option in the Appearance section and enable it. You can always turn off the option to revert back to the original color.

3. Alternatively, you can press Ctrl + Alt + I while Magnifier is on to invert the colors. Press the same keyboard shortcut to invert it back to its normal color.
With the Magnifier tool, you will see words and images better on your Windows 11 computer screen. Eye strain is also improved thanks to the tool's color inversion option. In addition to this tool, Windows 11 has many other accessibility features that you can enjoy.


No comments:
Post a Comment