You can change your PC's power plan settings using the Power saver, Balanced, High Performance, and Ultimate Performance options in Windows 11 and 10. However, those special options are not accessible in the Control Panel.
A good way to set up shortcuts for those options is to add the Choose Power Plan submenu to the context menu in Windows 11/10. You'll then be able to access those power plan settings with just a click or two from the screen. Here are two ways you can add submenu including power plan options to the context menu in Windows 11/10.

How to add power plan option to context menu using registry script
To customize the context menu in Windows 11 and 10, you have to tweak the registry in one way or another. You can add a Choose Power Plan submenu entry to your context menu by creating and running a registry script for that purpose. Here's how you can set up such registry script with Notepad in Windows 11/10:
1. Open the Windows Notepad application.
2. Select this script text and press Ctrl + C.
Windows Registry Editor Version 5.00
Windows Registry Editor Version 5.00

[HKEY_CLASSES_ROOT\DesktopBackground\Shell\PowerPlan]
	"Icon"="powercpl.dll"
	"MUIVerb"="Choose Power Plan"
	"Position"="Middle"
	"SubCommands"=""


	[HKEY_CLASSES_ROOT\DesktopBackground\Shell\PowerPlan\Shell\01menu]
	"MUIVerb"="Power Saver"
	"Icon"="powercpl.dll"

	[HKEY_CLASSES_ROOT\DesktopBackground\Shell\PowerPlan\Shell\01menu\command]
	@="powercfg.exe /setactive a1841308-3541-4fab-bc81-f71556f20b4a"


	[HKEY_CLASSES_ROOT\DesktopBackground\Shell\PowerPlan\Shell\02menu]
	"MUIVerb"="Balanced"
	"Icon"="powercpl.dll"

	[HKEY_CLASSES_ROOT\DesktopBackground\Shell\PowerPlan\Shell\02menu\command]
	@="powercfg.exe /setactive 381b4222-f694-41f0-9685-ff5bb260df2e"


	[HKEY_CLASSES_ROOT\DesktopBackground\Shell\PowerPlan\Shell\03menu]
	"MUIVerb"="High Performance"
	"Icon"="powercpl.dll"

	[HKEY_CLASSES_ROOT\DesktopBackground\Shell\PowerPlan\Shell\03menu\command]
	@="powercfg.exe /setactive 8c5e7fda-e8bf-4a96-9a85-a6e23a8c635c"


	[HKEY_CLASSES_ROOT\DesktopBackground\Shell\PowerPlan\Shell\04menu]
	"MUIVerb"="Ultimate Performance"
	"Icon"="powercpl.dll"

	[HKEY_CLASSES_ROOT\DesktopBackground\Shell\PowerPlan\Shell\04menu\command]
	@="powercfg.exe /setactive e9a42b02-d5df-448d-aa00-03f14749eb61"


	[HKEY_CLASSES_ROOT\DesktopBackground\Shell\PowerPlan\Shell\05menu]
	"MUIVerb"="Power Options"
	"Icon"="powercpl.dll"
	"CommandFlags"=dword:00000020

	[HKEY_CLASSES_ROOT\DesktopBackground\Shell\PowerPlan\Shell\05menu\command]
	@="control.exe powercfg.cpl"
3. Paste the script inside Notepad by pressing Ctrl + V.

4. Select File on Notepad's menu bar.
5. Click the Save As option of the File menu.

6. Next, click the Save As type drop-down menu and select All files from there. Type Power Plan Script in the File name box.
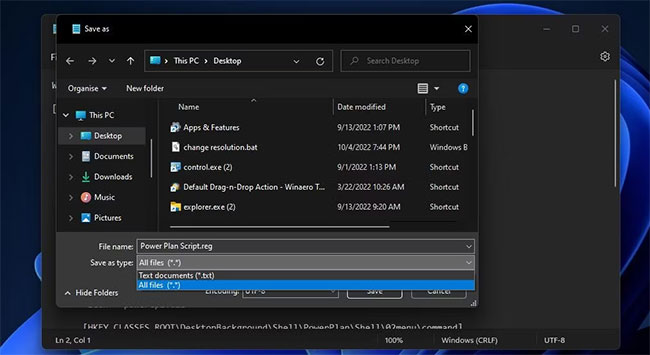
7. Click Desktop on the left side of the Save As window to select that location for the file, then click Save to add the script to the Windows desktop area.
8. Close Notepad after saving the file.
9. Double-click the Power Plan Script file on the desktop.
10. Select Yes on the Registry Editor dialog box that appears.
11. Click OK on the next dialog that appears.
You can now see the new Choose Power Plan submenu on the context menu. You'll need to right-click on the desktop and select Show more options to find that option on the classic context menu in Windows 11. Move the pointer over Choose Power Plan to select a Power Plan, Balanced, High Performance, or Ultimate Performance.

You can remove that submenu by deleting its registry. Open the Registry Editor application. Then remove the address bar there to enter this path:
Computer\HKEY_CLASSES_ROOT\DesktopBackground\Shell\PowerPlan
Right-click the Power Plan key and select the Delete option. A dialog box will open asking for confirmation. Select the Yes option there.

How to add power plan option to context menu with Winaero Tweaker
The free software Winaero Tweaker provides another way to add power plan options to the context menu in Windows 11/10. That software includes an Add Power Options check box that you can choose to add a Switch power plan submenu to the context menu. Here are the steps to add power plan options to the right click menu with Winaero Tweaker:
1. Go to the Winaero Tweaker download page. Select Download Winaero Tweaker on the software's website.
2. Install the downloaded software
3. Launch the Winaero Tweaker software.
4. Double-click Winaero's Context Menu category to select it.

5. Click Switch Power Plan to see the settings shown directly below.
6. Then select Add Switch Power context menu to the Desktop.

7. You should now see the Switch power plan submenu on the context menu in Windows 11/10. That submenu is slightly different from the one added by the script because it doesn't include the Ultimate Performance option. However, you can still choose Power Saver, Balanced, and High Performance options.

Winaero Tweaker also has an alternative customization option that adds a Power Options submenu to the context menu. That submenu provides shortcuts to open the Control Panel's power settings. You can add it to the context menu by choosing Power Options > Add Power Options to Desktop context menu in Winaero Tweaker.

Now you won't need to rummage through Control Panel to change power plan settings anymore. Adding a power plan submenu to the context menu will make those options directly accessible from the desktop in Windows 11/10. This will provide handy shortcuts for users who frequently change power plan settings on their PC.


No comments:
Post a Comment