Many Windows 11 users failed to get the Snipping Tool to work on their machines. Either the tool did not launch, did not take the screenshot, or the screenshot was black (or a portion was covered in black). The issue is reported on upgraded as well as clean installations of Windows 11. For many users, the issue is only limited to multi-display setup.

Are you facing issues with Snipping Tool not working in Windows 11? Microsoft replaced its classic screenshot grabber by merging its features with Snip & Sketch. The newer Windows 11 app looks like a simple change from Windows 10 but it is fraught with bugs. Users have reported various glitches, such as “the app can’t open” error or getting no response while grabbing screen caps. Here’s what you should do to make the app work properly.
1. Restart the Snipping Tool
Try restarting the Snipping Tool on your Windows 11 computer to check if the problem has been fixed or not.
1. Press the Ctrl + Shift + Esc keys to open the Windows 11 Task Manager.
2. Now, click on the Processes tab > Search for the Snipping Tool task from the list.
3. Right-click on the Snipping Tool task > Click on the End task option.
Once the task has been closed, make sure to reboot your PC, and try loading the Snipping Tool app again.
2. Reset or Repair the Snipping Tool
It is inevitable that once in a while, a bug might cause your programs or system files to malfunction. However, with Windows 11, it is now easier than ever to fix programs.
1. Open Windows Search by clicking on the search icon on the taskbar.
2. Type Snipping Tool.
3. Right-click on the Snipping Tool app and select App settings.
4. Scroll down to Reset and click on the Repair option. The system will attempt to repair the software.

5. If repairing the app does not solve the issue, try resetting the app by clicking on Reset. However, keep in mind that by doing so, you're going to lose all your app data.
Video:

5. Use Regedit
The Snipping Tool is installed and enabled by default on the Windows 11 operating system, but the Software Restriction Policy prevents some users from using it, or in some cases, restricts them from being able to view the app in the File Explorer.
If you are also facing similar issues and completely confused about what to do next,
1. Launch the Run dialog box by pressing Win + R on your keyboard. Type Regedit in the search box and press enter.. Select Yes and the Registry Editor will be displayed.
2. Go to: HKEY_LOCAL_MACHINE\SOFTWARE\Policies\Microsoft.
3. Locate the TabletPC key. If it doesn't exist, right-click on Microsoft, select New > Key, and name it TabletPC.
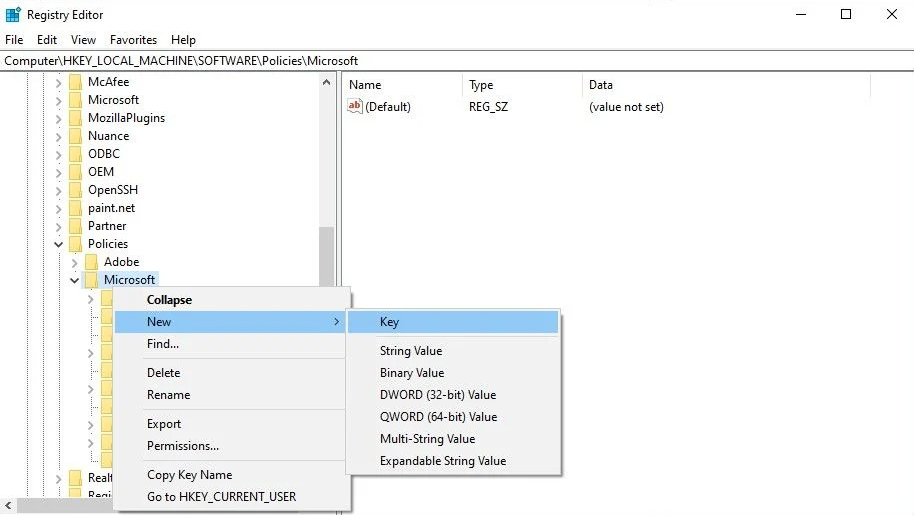
4. Right-click on this newly created key TabletPC > New > DWORD (32-bit) Value and rename it to DisableSnippingTool.

5. Double-click on DisableSnippingTool and make sure the Value data is set to 0 with Hexadecimal option also selected.
6. Close the Registry Editor, and try searching and opening the Snipping Tool. These steps will have reset and kick-started the app, allowing you to successfully take screenshots on your Windows 11.
6. Use the Snip & Sketch Tool
The Snipping Tool has been replaced by the new Snip & Sketch tool by Microsoft, and as a result, the former’s stopped working on many PCs. The most straightforward solution is to use some other method for taking screenshots or upgrade to the more advanced Snip & Sketch tool manually. To do this:
1. Find the Microsoft Store pinned on your Windows 11 taskbar and open it.
2. Search Snip & Sketch.
3. Click on the Get button which will prompt app installation.
4. Once the app is installed, you can start using Snip & Sketch by selecting Open.
If your Snipping Tool is still missing or not working, you can try to download it manually or use another screenshot tool.


No comments:
Post a Comment