Does your monitor screen dim or become darker when playing games or watching videos? In this guide, I will tell you how to fix blurry screen while playing games in Windows 11/10.
Games are a major reason people invest a significant amount of money in buying a computer. There are dedicated gaming PCs and laptops, and people build their desktop setups with specific configurations to enjoy their favorite games to the fullest. But if the screen goes black, it becomes annoying.

What causes the screen to be dim when playing games?
When playing games or watching videos in Windows 11/10, you may notice a decrease in screen brightness during gameplay, resulting in a darkening of the screen while playing games. You may have this problem due to auto dimming settings, power saving settings or even your GPU. Make sure the game is up to date to avoid any chromatic aberrations in the game.
There are monitors with pre-enabled auto-dimming that adjusts the screen's brightness based on the lighting environment and desktop location. Similar to this monitor feature is the Windows brightness setting in the Notebook. These settings are similar to the in-display brightness settings, as they adjust the screen's brightness to provide a comfortable viewing experience. Nowadays, we can see features like this on most smartphones.
You may also experience screen dimming issues if you have power saving features enabled on your PC. For a long-lasting battery backup, most power-saving techniques will automatically deduct the screen's brightness level.
You may need to check out dedicated graphics cards if you are using them. Some games may cause your graphics card to display the wrong colors, so your screen appears dim and darker. Finally, make sure that the Windows PC drivers are up to date.
A. Disable Adaptive Brightness
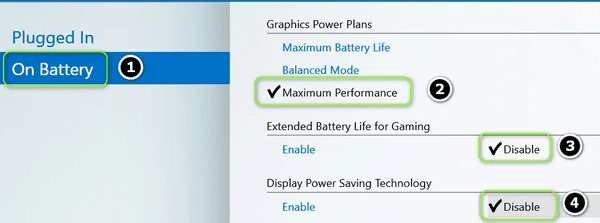
If the power saver settings are affecting the screen brightness, we recommend disabling adaptive brightness using the Control Panel. This feature is available on systems with an external light sensor.
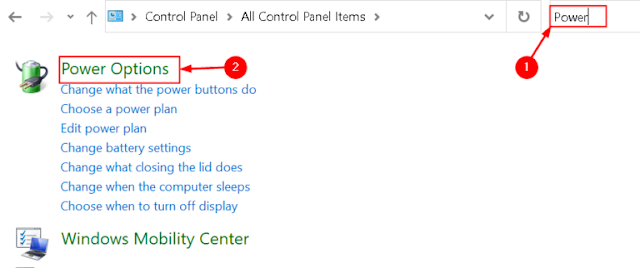
1. Press Windows Keys + R. To open Control Panel, type control in the Run dialog box

2. Type Power in the search box at the top and select Power Options in the search results.
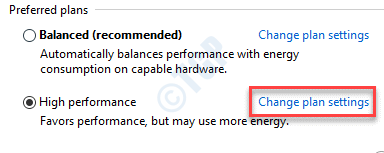
3. Click Change plan settings.
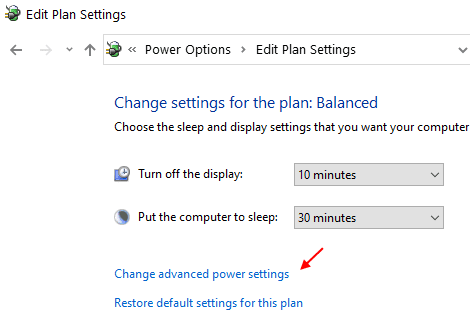
4. Then select Change advanced power settings.
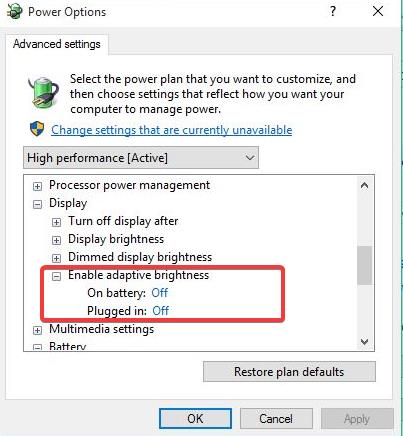
5. Look for the Enable adaptive brightness option under Display in the Settings list.
6. Toggle off options for both On Battery and Plugged in to ensure that your PC doesn't automatically change your screen brightness based on your surroundings.

D. Rollback/Reinstall Display Driver
Outdated, corrupted, or incompatible graphics drivers can give rise to screen dimming problems. Users have found that rolling back, updating, or reinstalling the driver helped them fix this problem.
1. Open Run Windows Keys + R. Type devmgmt.msc to open Device Manager.

2. Expand Display Adapter.
3. Right-click the graphics driver and select Properties.

4. Scroll to the Drivers tab and click the Roll Back Driver button and follow the prompts to restore the driver.

5. Restart your system and check if the problem is resolved.
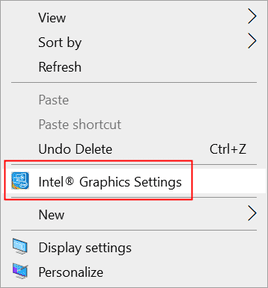
E. Reinstall the Graphics Driver
1. In Device Manager, right-click on the Graphics device and choose Uninstall device.

2. Then, check the box next to Delete the driver software for this device and click on Uninstall.

3. Follow the prompts to complete the uninstallation process. Reboot your system.
4. On rebooting, if the default Graphics driver is installed by Windows, wait for it to complete and check if the issue is resolved.
5.. If not, install the latest driver downloaded in here:
Intel – https://downloadcenter.intel.com/product/80939/Graphics-Drivers
Nvidia – http://www.nvidia.com/Download/index.aspx
AMD ATI – http://support.amd.com/en-us/download
Check if the issue resolves when playing full-screen games.
F. Installing Pending Window Driver Updates
1. Press Windows Keys + I to open the Settings window.
2. Select Update & Security.

3. On the left, you can see the Windows Update option. Check if there are any driver updates available for your system.

4. Make sure that there is no pending update to install. Check if it resolves the issue at hand.
G. Disable Windows Game Mode and Game Bar
Users have noticed that if the Windows Game Mode or Game Bar is enabled, the screen goes dim while playing games.
1. Press Windows keys + I to open Settings.
2. Select Gaming settings.

3. Disable Game Bar in the XBox Game Bar tab.

4. Next move to the Game Mode tab and toggle off Game Mode.

5. Check if the screen dimming issue is resolved. If not, go back to Settings and select System.

6. Disable Night Light if it is enabled and check if it resolves the dimming issue.

Thanks for reading.
We hope this article was helpful in solving your screen dimming problem when playing a full screen game. Comment and let us know if you run into any issues while trying the fixes.


No comments:
Post a Comment