If you're an experienced Windows user who recently upgraded to Windows 11, you may have noticed that the Start menu doesn't have a Hibernate power option anymore. Microsoft removed hibernation from the default Power menu in Windows 11, but you can still restore it and extend your system's battery life.
Hibernate mode is similar to Sleep mode, but it prolongs battery life by saving the current system state to a file on your hard drive and then using that mode to resume work when you start it up. . Here's everything you need to know about how to enable and configure Hibernate mode on Windows 11.
How to enable Hibernate mode on Windows 11
As mentioned above, the Hibernate option is missing from the Power button in the Start menu. Similarly, you also cannot access it through other Power options in Windows 11, so you will have to enable it through Control Panel settings manually.
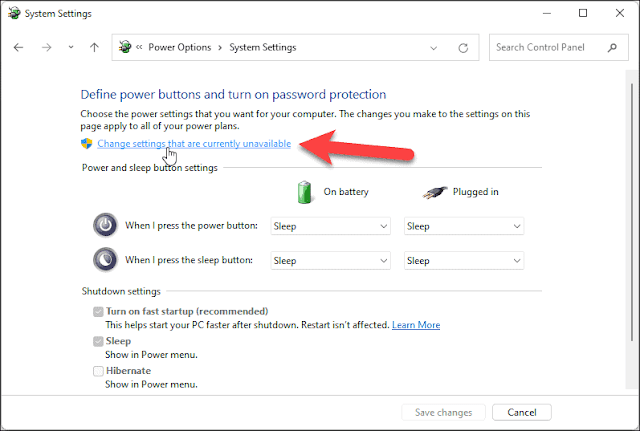
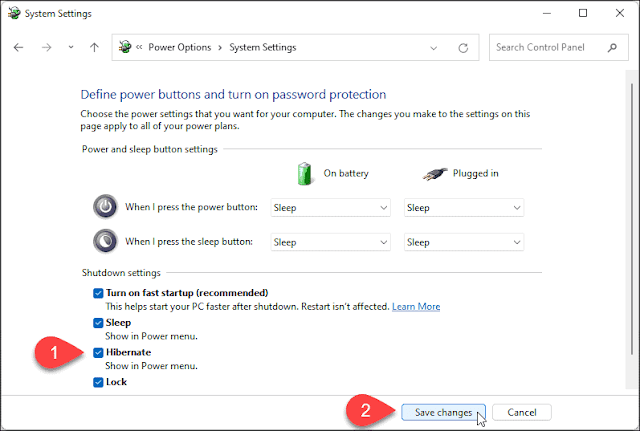
A. Enable Hibernate Using Power Options
1. Click Search from Taskbar. Type control, then press Enter


B. Enable Hibernate Mode Using Command Prompt
Another way to enable Hibernate in Windows 11 is through Command Prompt,
1. Click on the Search Icon on the Taskbar near the Start Menu and type Command Prompt. Click on Run as administrator.

2. Type powercfg.exe /hibernate on and hit enter to enable Hibernate Mode using Command Prompt in Windows 11.

Note: Once you hit the enter key, command Prompt will enable the Hibernate option in Windows 11, It will not show any Successful message on the screen, but it doesn’t mean it’s not enabled. So don’t repeat the step again and again
If you want to disable Enable Hibernate in Windows 11 run the following command-line (cmd) powercfg.exe /hibernate off.
How to customize hibernation on Windows 11
After enabling Hibernate mode on Windows 11, you can adjust a number of settings to customize it to suit your workflow.
1. Open the Start menu, search for Control Panel and Enter
2. Click System and Security, then click Power Options.

3. For the currently selected power plan, click Change plan settings, then select Change advanced power settings to open the Power Options dialog box.

4. Expand the Sleep options and then expand the Hibernate after options.
5. Adjust the time it takes to enter hibernation mode when on battery (On Battery) and plugged in (Plugged in).
6. To make your changes permanent, click Apply and then OK.
Similarly, you can also configure hibernation as the default power mode when the lid is closed or the machine is idle. You can set these options through Control Panel > System and Security > Power Options > Choose what closing the lid does.
Laptops usually don't have long battery life, so a long day of work will be more difficult if the machine runs out of battery quickly. Hibernation extends battery life, saving currently open files and programs in a file, so you can quickly restore the current state when you return to work.


No comments:
Post a Comment