Your Windows 11 PC has thousands of files stored in folders. You may not have access to a large percentage of these, but they are vital to the system's operation. However, some of these files are not associated with any important processes and you should delete them periodically for the system to function properly.
Your system may have temporary files ranging from application data, error logs and data, browsing data, windows updates and settings files, etc. Unfortunately, these files are lying around taking up space on your computer, and your chances of using them are bleak.
However, we recommend identifying what you may need and then making an informed decision. If you're running low on storage space and it's already starting to affect system performance, it makes sense to delete the files. To determine, you need to know the different types of temporary files.
Delate temporary files via Settings
1. Open Settings via the Windows + I
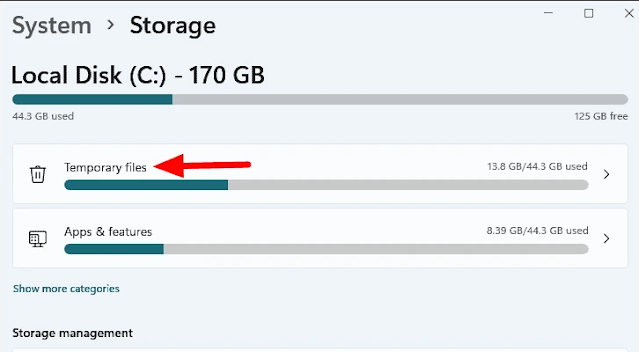
2. You will be taken to the System section, select Storage from its right menu.
2. Next, wait for Windows to calculate the storage under each category and then click on Temporary files.
3. Tick the checkboxes for the files you want to delete and uncheck the ones you want to keep. The total space that will be cleared post deletion is mentioned above the list of temporary files. After you have made the necessary selection, click on Remove files to delete them.
That's it. These are the steps to delete temporary files in Windows 11 through its Settings page
Delete Temporary Files via Disk Cleanup
Disk Cleanup is a built-in Windows tool that can be used to scan and delete temporary files stored on your PC
1. Go to the Start Menu, search for Disk Cleanup and open it.
2. Now select the drive from where you want to delete the files and press OK.(ex:Windows C:)
3. Then enable all types of temporary files that you want to remove from your PC.
4. Finally, click OK and wait for the process to complete.
5. If you also want to clear cache files stored on your system, click on System Files Cleanup.
6. Again, select the drive to scan and click OK.
7. Microsoft will start scanning and showing the total amount of storage that you can free up by deleting system files. Tick the desired temporary files that you want to delete and click OK.
That's it. This is how you can delete temporary files in Windows 11 through the Disk Cleanup utility tool.
Delete temporary files via File Explorer
Windows stores temporary files related to various applications and services inside the TEMP Folder. Thus, you can browse to that location and empty the contents of that folder. This will delete all temporary files stored on your PC and free up needed space.
1. Press Windows + R to open the Run dialog box.Then type %temp% and press Enter. You will be taken to your PC's temporary folder.
2. Press Ctrl + A to select all files and then press Shift + Del to permanently delete these files.
These are short and quick steps to delete temporary files in Windows 11 through File Explorer. If you want an even faster method to achieve said task, then move on to the next approach.
Delete temporary files via Command Prompt
You can also delete all Temp folder contents by executing just one command line.
1. Go to Start Menu and search for CMD. Then, launch a Command Prompt window as administrator.
2. Finally, copy-paste the command below and press Enter:
del /q/f/s%TEMP%\*
That's it; all temporary files will be deleted from your PC immediately.
Delete Temporary Files via Storage Sense
Storage Sense is probably among the most underrated tools from Windows that doesn’t get the appreciation that it deserves. For the unaware, this tool automatically scans and deletes all the temporary files at regular intervals without any manual intervention from your end. You only need to configure it once, and the rest would then be taken care of by itself.
1. Open Settings via the Windows + I
2. Then go to Storage > Storage Management and enable the toggle next to Storage Sense.
3. Now, click on the Storage Sense option to configure the various options.
4. Next, click on the drop-down menus for each of the options under ‘Configure cleanup schedules’ and select the desired option.
5. Once you have configured Storage Sense, it will automatically clean temporary files on your system as per the set schedule.
Also, you can clean the temporary files using ‘Storage Sense’ right away by clicking on the Run storage sense now option at the bottom.
Storage sense will now delete the temporary files on the system. It may take a few minutes for the process to complete, but you can work simultaneously and let the process run in the background.


No comments:
Post a Comment