By default, Windows 10 has a 10-second delay during startup before all of your apps and programs are accessible. This is called "Boot Delay" and it helps make sure everything is working as it should when you start your PC. However, if you have a powerful PC or don't have a lot of startup programs in Windows 10, then you can try to reduce or even turn off boot latency altogether to help your PC start up faster.
Do this using the registry editor, but before you get started, you should make sure you back up your Windows registry in case you make a mistake along the way. (This won't happen if you follow the instructions!)
1. Click on the Start button and type in Regedit and Run as administrator.
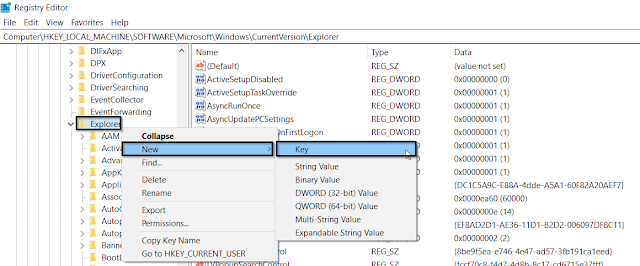
2. Go to HKEY_CURRENT_USER\Software\Microsoft\Windows\CurrentVersion\Explorer\Serialize.3. If the Serialize key does not already exist, you will need to create it. Right-click on (Explorer) and select New > Key. Name it Serialize.
4. Click on New Key #1 > Rename. Name it Serialize.
5. Then Click on Serialize > New > DWORD (32-bit) Value.
6. After creating Serialize, Select it and on the right of it, right-click on a blank space and select New > DWORD (32-bit) Value. Rename it StartupDelayInMSec.
7. Click on Serialize, Select the new value StartupDelayInMSec and double click on it, then make sure that valuable data is set to 0 and click OK.
8. After click OK and then exit Registry Editor. For the change to take effect, you must restart your computer.
Do you ever want to re-enable this delay because your startup program is asking to sign in,
Go to HKEY_LOCAL_MACHINE\SOFTWARE\Microsoft\Windows\CurrentVersion\Explorer\Serialize, Right-click on StartupDelayInMSec, and delete StartupDelayInMSec value.


No comments:
Post a Comment