However, if you want to have access to Cortana on the lock screen for longer or want to see the time and other notifications on the lock screen, then you can increase the lock screen time out. Here is how you can increase lock screen timeout in Windows 10.
Method 1: Increase Screen Timeout Setting from Windows Settings
1.Press Windows Key
 + I to open Settings then click on Personalization.
2.From the left-hand menu choose Lock Screen.
3.Now scroll down till you find Screen timeout settings and once you find it click on it.
4.Set the time setting under Screen to a little higher if you want to avoid turning off the screen every now & than.
5.If you want completely disable the setting then choose Never from the dropdown.
6.Also, make sure that the sleep time is set higher than the screen turn off time or else the PC will go to sleep and the screen wouldn’t be locked.
7.It’s preferred if Sleep is disabled or atleast set at 30 minutes or more, in this case, you will have a lot of time to get back to your PC, if not then it will go into sleep mode.
8.Reboot your PC to save changes.
Method 2: Change Lock Screen Timeout Setting from Control Panel
1.Press Windows Key
 + X then select Control Panel.
2.Click System and Security then click on Power Options.
3.Now click Change plan settings next to your currently active power plan.
4.Again set the same settings as advice in the previous method.
5.Make sure to set the settings for both battery and plugged in option
Method 3: Using Registry
1.Press Windows Key
 + R then type regedit and hit Enter to open Registry Editor.
2.Navigate to the following path in the Registry:
HKEYLOCAL_MACHINE\SYSTEM\CurrentControlSet\Control\Power\PowerSettings\7516b95f-f776-4464-8c53-06167f40cc99\8EC4B3A5-6868-48c2-BE75-4F3044BE88A7
3.On the right-hand side window double click on Attributes DWORD.
4.If you can’t find it then you need to create the DWORD, right-click in an empty area in the right-hand side window and select New > DWORD (32-bit) value.
5.Name it as Attributes and double click on it.
6.Now change its value from 1 to 2 and click OK.
7.Reboot your PC to save changes.
8.Now right-click on Power icon on the system tray and select Power Options.
9.Click Change plan settings next to your currently active plan.
10.Then click Change advanced power settings.
11.Scroll down till your see Display, then click on it in order to expand its settings.
12.Double click on Console lock display off timeout and then change its value from 1 minute to the time you want.
13.Click Apply followed by OK.
14.Reboot your PC to save changes.
Method 4: Change Lock screen timeout Settings using Command Prompt
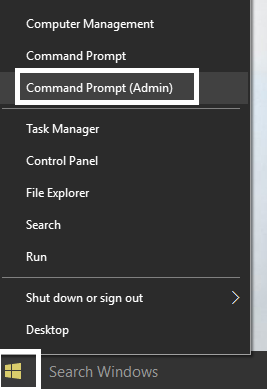
1.Press Windows Key
 + X then select Command Prompt (Admin).
2.Type the following command and press Enter:
powercfg.exe /SETACVALUEINDEX SCHEME_CURRENT SUB_VIDEO VIDEOCONLOCK 60
powercfg.exe /SETDCVALUEINDEX SCHEME_CURRENT SUB_VIDEO VIDEOCONLOCK 60
Note: You must replace the “60” in above command with the screen timeout setting you want (in seconds) for example if you want 5 minutes then set it at 300 seconds.
3.Again type the following command and hit Enter:
powercfg.exe /SETACTIVE SCHEME_CURRENT
4.Reboot your PC to save changes.


No comments:
Post a Comment