The “This app can’t run on your PC” can affect any and all Windows software and apps, making it exceptionally troublesome. In addition, the error message can also affect multiple applications on the same computer, proving to be remarkably pesky as well. Thankfully, though, this error message can, in most cases, be gotten rid of provided the affected user applies the right solution for their specific case. The following are some of the most effective solutions that you can use to try and get rid of the “This app can’t run on your PC” error message and resolve this problem:
Fix "This app can’t run on your PC" Error in Windows 10
Solution 1: Use a new administrator account
1.Press the Windows key
 + I. Then click Account.
 2.On the left side of the pane, click Family & other people. On the right side, scroll down a little bit to locate Other people section. Then click Add someone else to this PC.
Note: On some versions, the listed options could be Family & other users and Other users.
3.Click I don’t have this person’s sign-in information.
4.Click Add a user without a Microsoft account.
5.Finish typing in your personal information for your new account, and click Next to continue.
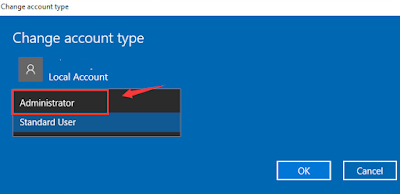
6.You should be able to see the new account just created. We need to click it and click Change account type.
7.Click Administrator. Click OK to save the change.
8.If switching to a new administrator account solve your problem, you need to move your personal files and folders to this new account and use it from now on.
Solution 2: Install the right version of programs
One of the most commonly seen reasons for this error message is that you have downloaded the wrong program for your operating system. For example, you’re in Windows 32-bit, but you download a program for Windows 64-bit OS. Double-check the program you are to install and make sure that you have the correct setup files downloaded.
If most of your programs or applications are 64-bit based, you'd better upgrade Windows 10 from 32 bit to 64 bit without losing data. Before you upgrade to 64-bit, you must backup all of your important files with a free backup program. EaseUS Todo Backup allows all Windows users to back up their data under Windows 10/8/7 etc with simple clicks. It's free to back up anything you need.
Solution 3: Disable SmartScreen
1.Type smart screen in the search box and click App & browser control.
2.Click the Off option under the Check apps and files category.
3.You need to provide administrator approval to proceed. Click Yes at the User Account Control window to continue.
4.Try to reinstall the app you wanted to install now. See if the notification appears again.
If it reappears, change your SmartScreen filter back to Warn status. This to a large extent prevents you from viruses or malware.
Solution 4: Enable Sideload apps
1.Press the Windows key
 + I. Then click Update & security.
 2.On the left side of the pane, click For developers. Then click Sideload apps on the right side.
Solution 5: Repari Registry
1.Press the Windows key + X to open the Win + X menu.Click Command Prompt (Admin) to open the Command Prompt as an administrator.
2.When Command Prompt opens, enter sfc /scannow and press Enter.
3.The repair process will now start. Don’t close Command Prompt or interrupt the repair process. The repair process can take a while, so wait patiently while it completes.
4.When the SFC scan is complete, the Command Prompt might state, “Windows Resource Protection found corrupt files and successfully repaired them.” If that’s the case, restart Windows.
Solution 6: Using Windows Assessment and Deployment Kit (Windows ADK)
1.Download Windows Assessment and Deployment Kit from Microsoft’s official website. Download the application according to the version of Windows installed on your computer.
2.Launch the executable to install the application. Make sure that you check “Application Compatibility Tools” when installing it.
3.The install might take a while. Make sure that you have an active internet connection and wait for the installation to complete.
4.After the installation is complete, press Windows + S, type “compatibility” and open the application.
 + S, type “compatibility” and open the application.
5.Now open “applications” using the left navigation pane and search for the application which is causing you trouble.
6.Let’s suppose World of Warcraft I causing the error. Right-click on the application and click Disable Entry. Now try launching the application again and check if the problem got solved. Make sure to restart your computer too.
Video:
If the error still happens after you have tried one of the fixes above, you can still try the following solutions or ask us for help directly.
- Update Windows Store
- Disable Proxy or VPN
- Clear your browser cache
- Download the application again using a different web browser
- Perform a Windows 10 clean boot


No comments:
Post a Comment